


3-2
Manual Verification
Manual Performance Verification
Manual Performance Verification
The manual performance verification procedure in this chapter provides a
high level of confidence that the Agilent 8702D is working properly. If you can
locate the
Agilent 8702D Verification Data Disk
, perform the automated
version instead, which is documented in Chapter 2, “Automated Verification”.
Allow the Agilent 8702D to warm up for one hour before starting this proce-
dure.
In order to run this procedure, the following equipment is required:
Calibration Kit, 7 mm . . . . . . . . . . . . . . . . . . . . . . . . . . . . . . . . .Agilent 85031B
Verification Kit, 7 mm . . . . . . . . . . . . . . . . . . . . . . . . . . . . . . . .Agilent 85029B
Test Port Extension Cable Set, 7 mm . . . . . . . . . . . . . . . . . . . .Agilent 11857D
Printer . . . . . . . . . . . . . . . . . . . . . . . . . . . . . . . HP ThinkJet/DeskJet/LaserJet
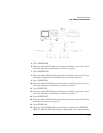
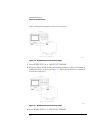
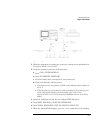
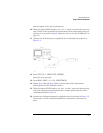
Step 1. Initialization
1
Connect the equipment as shown in Figure 3-1. Let the Agilent 8702D warm up
for one hour.
Agilent 8753D is shown in the figures
The procedures in this chapter are designed to work with Agilent 8702D and
Agilent 8753D instruments. Because of this, many of the figures label the instrument
being tested as an Agilent 8753D. Simply substitute your Agilent 8702D for the
Agilent 8753D.