


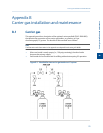
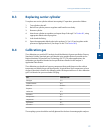

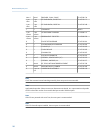


V-1 Carrier cylinder 1 Bleed valve
V-2 Carrier cylinder 1 Block valve
V-3 Carrier cylinder 2 Block valve
V-4 Carrier cylinder 2 Bleed valve
B.2 Installation and line purging
To install and purge the dual-bottle carrier gas manifold, proceed as follows:
1. Install manifold as shown in Figure B-1. Close all valves and tighten all fittings. Run
tubing to the GC, but do not connect.
2. Back off pressure regulator (counter clockwise) fully.
3. Open cylinder valve for Carrier Cylinder 1.
The pressure indicator will read the cylinder pressure.
4. Open the shut-off valve attached to the carrier regulator.
5. Regulate pressure out of the cylinder to 20 psig, then close the cylinder valve.
6. Open V-1 (bleed valve) and let the carrier gas bleed to atmosphere until both
gauges read 0 psig, then close V-1.
7. Repeat Step 4 and Step 5 twice to purge the line to V-2.
8. Purge the line to V-3 by repeating Step 2 through Step 6; but this time, use bleed
valve V-4 and Carrier Cylinder 2.
9. With valves 1-4 closed, open both cylinder valves and regulate both carriers to
approximately 10 psig.
10. Open V-2 and V-3 simultaneously, then turn both cylinder valves off and let the
carrier gasses bleed through the line to the GC until all gauges read 0 psig.
11. Repeat Step 8 and Step 9 twice to purge the line to the GC.
12. Close V-3, leave V-2 open.
13. Open the cylinder valve of Carrier Cylinder 1 and, with carrier gas flowing at 10 psig
or below, connect the carrier line to the GC.
14. Slowly regulate Carrier Cylinder 1 to 110 psig.
15. Open V-3 and slowly regulate Carrier Cylinder 2 to 100 psig.
By doing this, all but 100 pounds of Carrier Cylinder 1 will be used before any of
Carrier Cylinder 2 is used. When Carrier Cylinder 1 gets to 100 pounds, replace the
cylinder.
16. Leak-check all of the fittings carefully.
17. Let the GC run overnight before calibrating.
Carrier gas installation and maintenance
176