12-35
Catalyst 2960 and 2960-S Switch Software Configuration Guide
OL-8603-09
Chapter 12 Configuring Interface Characteristics
Configuring Layer 3 SVIs
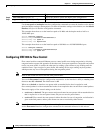
Beginning in privileged EXEC mode, follow these steps to add a description for an interface:
Use the no description interface configuration command to delete the description.
This example shows how to add a description on a port and how to verify the description:
Switch# config terminal
Enter configuration commands, one per line. End with CNTL/Z.
Switch(config)# interface gigabitethernet0/2
Switch(config-if)# description Connects to Marketing
Switch(config-if)# end
Switch# show interfaces gigabitethernet0/2 description
Interface Status .Protocol Description
Gi0/2 admin down down Connects to Marketing
Configuring Layer 3 SVIs
Note Only switches running the LAN base image support Layer 3 SVIs for static routing.
You should configure SVIs for any VLANs for which you want to route traffic. SVIs are created when
you enter a VLAN ID following the interface vlan global configuration command. To delete an SVI,
use the no interface vlan global configuration command. You cannot delete VLAN 1.
Note When you create an SVI, it does not become active until you associate it with a physical port.
For information about assigning Layer 2 ports to VLANs, see Chapter 13, “Configuring
VLANs.”
A Layer 3 switch can have an IP address assigned to each SVI, but the switch supports static routing on
16 SVIs. All Layer 3 interfaces require an IP address to route traffic. This procedure shows how to
configure an interface as a Layer 3 interface and how to assign an IP address to an interface.
Command Purpose
Step 1
configure terminal Enter global configuration mode.
Step 2
interface interface-id Specify the interface for which you are adding a description, and enter
interface configuration mode.
Step 3
description string Add a description (up to 240 characters) for an interface.
Step 4
end Return to privileged EXEC mode.
Step 5
show interfaces interface-id description
or
show running-config
Verify your entry.
Step 6
copy running-config startup-config (Optional) Save your entries in the configuration file.


