


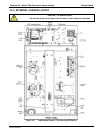


Teledyne API – Model T400 Photometric Ozone Analyzer Getting Started
49
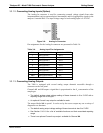
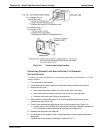
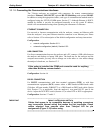
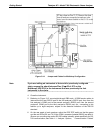
“ALARM 2” RELAY & “ALARM 3” RELAY
Alarm 2 relay is associated with the “Concentration Alarm 1” set point in the software;
Alarm 3 relay is associated with the “Concentration Alarm 2” set point in the software.
Alarm 2 Relay O
3
Alarm 1 = xxx PPM
Alarm 3 Relay O
3
Alarm 2 = xxx PPM
Alarm 2 Relay O
3
Alarm 1 = xxx PPM
Alarm 3 Relay O
3
Alarm 2 = xxx PPM
Alarm 2 relay will be turned on any time the concentration value exceeds the set-point,
and will return to its normal state when the concentration value returns below the
concentration set-point.
Even though the relay on the rear panel is a NON-Latching alarm and resets when the
concentration goes back below the alarm set point, the warning on the front panel of the
instrument will remain latched until it is cleared. You can clear the warning on the front
panel either manually by pressing the CLR button on the front panel touch-screen or
remotely through the serial port.
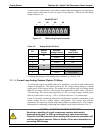
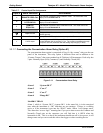
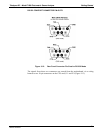
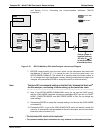
The software for this instrument is flexible enough to allow you to configure the alarms
so that you can have two alarm levels for each concentration.
O
3
Alarm 1 = 2 PPM
O
3
Alarm 2 = 10 PPM
O
3
Alarm 1 = 2 PPM
O
3
Alarm 2 = 10 PPM
In this example, O
3
Alarm 1 and O
3
Alarm 1 will both be associated with the “Alarm 2”
relay on the rear panel. This allows you to have multiple alarm levels for individual
concentrations.
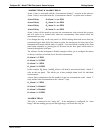
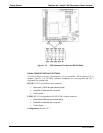
A more likely configuration for this would be to put one concentration on the “Alarm 1”
relay and the other concentration on the “Alarm 2” relay.
O
3
Alarm 1 = 2 PPM
O
3
Alarm 2 = Disabled
O
3
Alarm 1 = Disabled
O
3
Alarm 2 = 10 PPM
“ALARM 4” RELAY
This relay is connected to the “range bit”. If the instrument is configured for “Auto
Range” and the reading goes up into the high range, it will turn this relay on.
06870C DCN6332