


Appendix C Upgrade Key 175
C
Upgrade Key
Introduction
This section tells you how to use an upgrade key to upgrade the software of the Philips
Series 50 A and IP-2 fetal monitors. Option C01 (adding twin ultrasound capability),
applies only to the 50A .
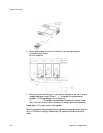
Upgrade Procedure
1. Disconnect all transducers (and telemetry) from the monitor.
2. Switch on the monitor.
3. Plug the upgrade key into the service socket (see Figure 1-1 on page 5) on your
monitor (if applicable, first remove the little plastic cap on the service socket).
• The “start upgrade” tone sounds (two short beeps) when the upgrade begins.
• After about 45 seconds the fetal monitor display should change to
“
-8-”.
• Within 7 minutes, the display counts down to “
-0-”.
4. At the end of the procedure, you will hear the “upgrade successful” tone (a continuous
beep lasting two seconds). The monitor display shows “
-0-”. Unplug the upgrade key
from the monitor.
If you don’t hear the “start upgrade” tone or you hear the “upgrade failed” tone (a
series of short beeps lasting 2 seconds), there may be several reasons:
• The battery in the upgrade key may be low. Replace the battery.
• You may already have carried out the maximum number of upgrades. The
upgrade key is programmed to perform the number of upgrades ordered, to a
maximum of 8.
If you hear the upgrade failed tone, (a series of short beeps lasting 2 seconds), disconnect the
upgrade key and try again from step 3 above.
If the upgrade still fails, carry out the quick test described on page 66. If the response is not
the same as that described in this manual, contact Philips Support Service.
5. Write the serial number of the upgraded monitor in the space provided on the key. In
this way you can keep a record of the monitors that have been upgraded.