


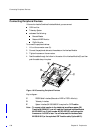
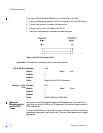
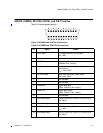
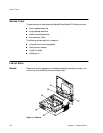

RS232 Serial Interface
114 Chapter 10 Peripherals
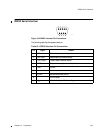
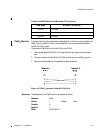
DIP Switch Settings The DIP switches for the FSpO
2
monitor must be set as follows:
DIP switches 3 and 4 set the baud rate to 2400. 6, 7, and 8 set the output format to
conversation mode. The positions of the other switches, shown with asterisks (*) above, do
not matter and may be either up or down.
Troubleshooting
FSpO
2
If the FSpO
2
monitor has two power switches (a mains switch at the rear of the unit and a
standby switch at the front of the unit) you should take care to switch them off and on in
the correct order. Failure to follow this prescribed sequence can cause the unit to appear to
malfunction by displaying data erratically, or not at all.
Switching off
1. Turn front switch (on/standby mode) to standby.
2. Turn rear switch (mains power switch) to off.
Switching on
1. Turn rear switch (mains power) to on.
2. Turn front switch (on/standby mode) to on.
If the unit behaves erratically, switch it off, exactly as detailed above, wait for five seconds,
then switch it on again.
When using the FSpO
2
monitor regularly, it is recommended to keep the rear switch in the
“on” position and use the front switch to change from on to standby mode.
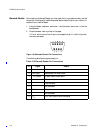
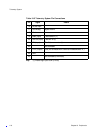
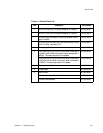
Table 10-4 FSpO
2
monitor DIP Switch Settings
DIP Switches and Settings
1 2 3 4 5 6 7 8 9 10
* *
*
* *