


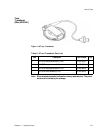
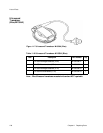
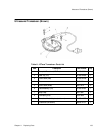

Toco Transducer (Brown)
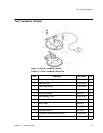
132 Chapter 11 Replacing Parts
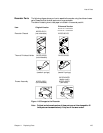
Caution
DO NOT use a screwdriver or similar flat-bladed instrument to separate the
transducer covers as this can damage the seals and cause leakage when the
transducer is re-assembled. Take care when removing the wires as they are
thin and can easily be damaged. NEVER pull the strain gauge button.
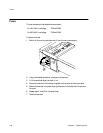
1. Disconnect the transducer from the monitor.
2. Remove screw covers
1 and 2: press a flat screwdriver into the covers and prise them
out.
Note— When reassembling the transducer, you will need new screw covers as the old
ones cannot be re-used.
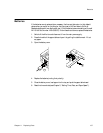
3. Partially undo screws 3. The two halves of the transducer can now be separated by
pressing down on the screws.
4. Remove the screws 3 and pull the two halves of the cover apart.
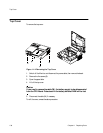
5. Disconnect the transducer cable from the strain gauge 4: use a soldering iron to
separate the three cable wires from the gauge.
6. Cut the clips holding the strain gauge and remove it.
Re-assembly is a reversal of the above procedure. The strain gauge assembly is a press fit into
the transducer cover.
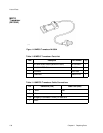
Note— Older Brown transducers can be repaired but Blue Toco transducers are
sealed units and are only factory repairable.
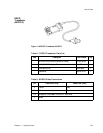
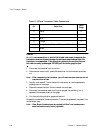
Table 11-12Toco Transducer Cable Connections
Pin Cable Color
Strain
Gauge
2Yellow 2
3 Green 4
4Blue 1
8Orange 3
1+6 Bridged by Code Resistor 4.53k
Ω p/n: 0698-4443
1Shield