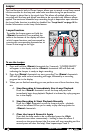
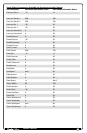
Owner's Manual
24
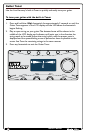
4. You can now record overdubs. To add an overdub, ensure the loop is playing. If it
is not, press the <Down> footswitch to initiate loop playback. Now press the
<Down> footswitch to start overdub recording. “OVERDUB” will appear in
the display.
5. To stop overdub recording, press the <Down> footswitch again. The loop will
continue playing, along with the newly recorded overdub. You now have the
option to undo the overdub or add another overdub, as described below.
A. Undo/Redo Overdub
Press and hold the <Down> footswitch for 2 seconds to undo the
overdub. If you perform the Undo function by accident, press and hold
the <Down> footswitch again to perform the Redo function and
retrieve the overdub.
NOTE: The Undo feature must be enabled in the System menu to
perform this action. See "Loop Undo" on page 38 for more
information.
B. Add Another Overdub
Repeat steps 4 and 5 to add further overdubs.
NOTE: Each time an overdub is added, the last overdub is merged with the
original loop and can no longer be undone using the Undo feature.
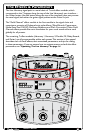
6. Press the <Up> footswitch to stop loop playback.
7. Press and hold the <Up> footswitch to clear the loop.
8. Press the <A/B> footswitch to exit Loop mode.
HINT: When recording overdubs, it is possible to change presets then
record loop overdubs with different effects applied. When in Loop mode, the
<Up>/<Down> footswitches are used for Looper control and therefore will
not change the preset. You can change the preset while looping by any one of the
following methods:
• Turn the <DATA> encoder,
• Exit Loop mode by pressing the <A/B> footswitch – any loop in memory will
remain there, and if the loop is currently playing, it will continue to play.
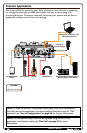
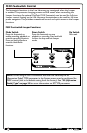
• For even more convenient preset switching while looping, add an optional FS3X
Footswitch for dedicated Looper control. For more information see "FS3X
Footswitch Control" on page 31
.