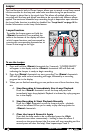
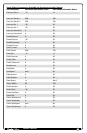
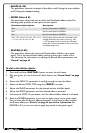
Owner's Manual
23
Looper
The Live Harmony's built-in Phrase Looper allows you to record a vocal loop, record
innite overdubs on the loop, and undo/redo overdubs during live performance.
The Looper is placed last in the signal chain. This allows all enabled effects to be
recorded with the loop and allows overdubs to be recorded with different effects
applied. The maximum allowable loop recording length is dependent upon whether
the Loop Undo function is enabled or disabled. See "Loop Undo" on page 38 for
further information on the Loop Undo feature.
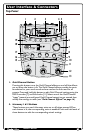
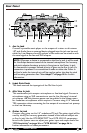
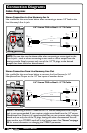
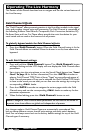
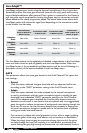
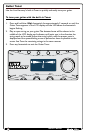
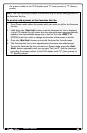
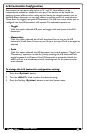
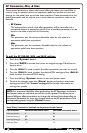
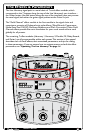
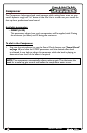
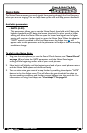
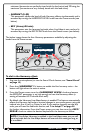
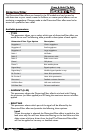
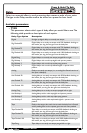
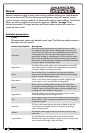
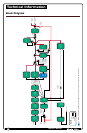
Looper Functions
To enable the Looper, press and hold the
<Down> footswitch. Once enabled, the
table at the bottom of the display will show
which Looper functions can be accessed by
pressing the corresponding footswitches, as
shown in the image to the right.
Harmony 2
Har
mo
n
y
L
e
v
e
l
V
oi
c
e
1
V
o
i
c
e
2
K
e
y
/
S
c
a
l
e
LOOPER READY
DOWN UP A/B
PRESET 1
RECORD EXIT
U01
To use the Looper:
1. Press and hold the <Down> footswitch for 2 seconds. “LOOPER READY”
will appear in the display and the <Down> footswitch LED will ash red,
indicating the Looper is ready to begin recording.
2. Press the <Down> footswitch to start recording. The <Down> footswitch
LED will light solid red and recording will begin, indicated by a recording
progress bar in the display.
3. When you are nished recording you can perform one of three functions, they
are:
A. Stop Recording & Immediately Start Loop Playback
Press the <Down> footswitch to set the loop end point and
immediately begin loop playback. Playback is indicated by a play progress
bar in the display.
B. Stop Recording & Start Playback Manually
Press the <Up> footswitch to set the loop end point – playback
will not be initiated. When you're ready to play the loop, press the
<Down> footswitch.
C. Clear the Loop & Record it Again
If you feel the loop needs to be re-recorded, press the <Up>
footswitch two times consecutively – holding it down for about 2
seconds on the second press (the rst press will stop recording and the
second press will clear the loop). Now repeat steps 2 and 3.