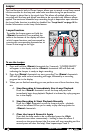
Owner's Manual
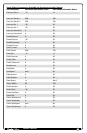
5
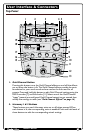
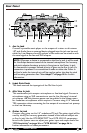
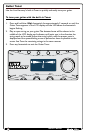
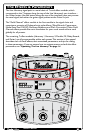
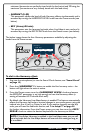
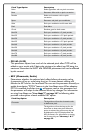
3. Vocal Effect Buttons
These buttons turn each corresponding Vocal effect on and off. Pressing and
holding each button will enter the menu for editing the selected effect's
settings (see "Vocal Effects" on page 16).
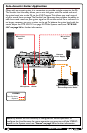
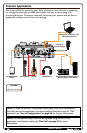
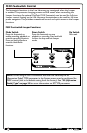
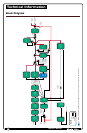
4. Live Adapt Mic
This internal analysis microphone listens to the music being played in the
room and adjusts settings in the Live Harmony automatically. It is used to
adjust tempo for delay and modulation effects, adjust the key for generated
harmonies and pitch correction/pitch effects, and adjust the noise gate
threshold.
NOTE: Whenever the Aux In jack is connected to an audio source, it will
be used for Live Adapt features instead of the internal microphone. When
a connection is made to the Guitar In jack, the guitar signal will be used
to determine the key/scale to follow for harmony generation and pitch
effects based on the chord progression played. See "Live Adapt™" on
page 20
for further information.
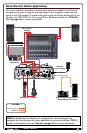
5. Guitar Effect Button
This button turns the Guitar effects on and off. The Guitar effects give you
two simultaneous effects to apply to your guitar signal: one allows you
to select one of the available modulation effects and the other is a xed
reverb with a mix level control. Use these effects when connecting your
guitar straight to the PA system through the Live Harmony's XLR or Line/
Headphone outputs. The Guitar effects only process the signal present at the
Guitar In jack. Pressing and holding this button will display the Guitar effect's
settings in the LCD display, where they can be modied using the DATA
encoder [7] and Edit knobs [11].
NOTE: The Guitar effect is passed to the XLR and 1/4" Line/Heaphone
outputs only. It is not passed to the Guitar Thru jack, as this jack is
intended to be used when connecting to your own personal outboard
guitar effects and/or guitar amplier (see "Guitar Effects" on page
17
).
6. Vocal Signal LED
This LED lights when the mic input signal is detected. This LED will light
green when a signal is present, orange when approaching the A/D limiting
point, and red when limiting occurs. Good practice is to set the microphone
Input Gain knob so the Signal LED lights green regularly, lights orange
occasionally, but never lights red.
NOTE: The Signal LED may also light red if the outputs clip due to
the added gain from multiple enabled effects. If such a condition is
encountered, simply lower the Input Gain knob until the Signal LED no
longer indicates clipping.