


Section 1
General Information
3-4 Receiving & Installation MN722
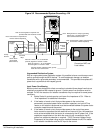
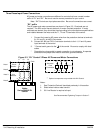
Optional Remote Keypad Installation The keypad may be remotely mounted using the optional Baldor keypad
extension cable. The keypad assembly (white - DC00005A-01; grey - DC00005A-02)
comes complete with the screws and gasket required to mount it to an enclosure. When
the keypad is properly mounted to a NEMA Type 4X indoor enclosure, it retains the Type
4X indoor rating.
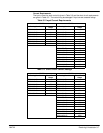
Tools Required:
• Center punch, tap handle, screwdrivers (Phillips and straight) and crescent
wrench.
• 8-32 tap and #29 drill bit (for tapped mounting holes) or #19 drill (for clearance
mounting holes).
• 1-
1
/
4
″ standard knockout punch (1-
11
/
16
″ nominal diameter).
• RTV sealant.
• (4) 8-32 nuts and lock washers.
• Extended 8-32 screws (socket fillister) are required if the mounting surface is
thicker than 12 gauge and is not tapped (clearance mounting holes).
• Remote keypad mounting template. A tear out copy is provided at the end of
this manual for your convenience.
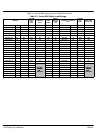
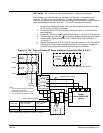
Mounting Instructions: For tapped mounting holes
1. Locate a flat 4″ wide x 5.5″ minimum high mounting surface. Material should
be sufficient thickness (14 gauge minimum).
2. Place the template on the mounting surface or mark the holes as shown.
3. Accurately center punch the 4 mounting holes (marked A) and the large
knockout (marked B).
4. Drill four #29 mounting holes (A). Thread each hole using an 8-32 tap.
5. Locate the 1-
1
/
4
″ knockout center (B) and punch using the manufacturers
instructions.
6. Debur knockout and mounting holes making sure the panel stays clean and flat.
7. Apply RTV to the 4 holes marked (A).
8. Assemble the keypad to the panel. Use 8–32 screws, nuts and lock washers.
9. From the inside of the panel, apply RTV over each of the four mounting screws
and nuts. Cover a
3
/
4
″ area around each screw while making sure to completely
encapsulate the nut and washer.
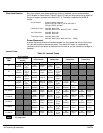
Mounting Instructions: For clearance mounting holes
1. Locate a flat 4″ wide x 5.5″ minimum high mounting surface. Material should
be sufficient thickness (14 gauge minimum).
2. Place the template on the mounting surface or mark the holes as shown on the
template.
3. Accurately center punch the 4 mounting holes (marked A) and the large
knockout (marked B).
4. Drill four #19 clearance holes (A).
5. Locate the 1-
1
/
4
″ knockout center (B) and punch using the manufacturers
instructions.
6. Debur knockout and mounting holes making sure the panel stays clean and flat.
7. Apply RTV to the 4 holes marked (A).
8. Assemble the keypad to the panel. Use 8–32 screws, nuts and lock washers.
9. From the inside of the panel, apply RTV over each of the four mounting screws
and nuts. Cover a
3
/
4
″ area around each screw while making sure to completely
encapsulate the nut and washer.