


Appendix A The Playback plug-in 140
Tips for using the Playback plug-in
The design of the Playback plug-in allows you to use it in many dierent ways. You should plan
how you intend to use the Playback plug-in when you are designing your concert to use it most
eectively. You can try out dierent placements and settings to decide how you want to use the
Playback plug-in in your concerts.
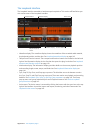
You start playback by sending a Play command to the Playback plug-in using a screen control,
such as a button, mapped to the Play/Stop parameter of the plug-in. To stop playback, you
send a Stop command using the same parameter. Alternatively, you can set the plug-in to
start when you select the patch or set, or when the Play action is triggered. You can control
other parameters of the Playback plug-in while you perform, including the Fade Out and Cycle
parameters. If the audio le contains marker information, you can use the Go To Previous Marker
and Go To Next Marker parameters to shift playback to dierent parts of the audio le, or use the
Go to Marker action to shift playback to a specic marker.
Note: When mapping a screen control to the Go to Marker action (in the Markers submenu), set
both the Button On and Button O parameters in the Screen Control Inspector to the value of
the marker, to ensure that the mapping works correctly.
A Playback plug-in in a patch plays only while the patch is selected. If you are using a Playback
plug-in at the set level, you can select dierent patches in the set (for example, dierent lead
synth or guitar solo patches) and have the audio le continue playing. If you are using a Playback
plug-in at the concert level, you can select dierent patches in the concert and have the audio
le continue playing.
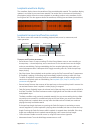
Assign Playback plug-ins to groups
The Playback plug-in provides an additional form of control using groups. If you use multiple
instances of the plug-in in your concert, you can use groups to control which instances play
together and which are mutually exclusive. When Playback instances are in the same group, a
change to the Play/Stop, Cycle, Fade Out, Return to Start, Go to Previous Marker, or Go To Next
Marker parameters in one instance changes that parameter for every member of the group. You
can use up to 100 groups, each identied by a dierent letter. Starting one group stops all other
groups, while ungrouped instances of the plug-in continue playing.
If you are using multiple instances of the Playback plug-in in a group, you can start and stop
their playback together by starting or stopping any member of the group using a screen
control mapped to the Play/Stop parameter. When playback instances are grouped, playback is
“locked” so changes in position aect all members of the group. You can control other aspects
of playback, such as having the group fade out or loop playback, using screen controls mapped
to the corresponding controls in the plug-in window of any member of the group. Playback
instances that are not members of a group are not aected.
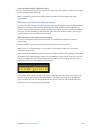
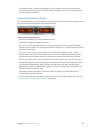
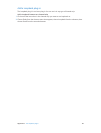
You assign an instance of the Playback plug-in to a group from the Group pop-up menu, located
in the lower-right corner of the plug-in window.
Assign a Playback plug-in to a group
1 If the Playback plug-in window is not open, double-click its name in the Input slot to open it.
2 Choose the letter of the group you want to assign the instance to from the Group pop-up menu.