9-6
Catalyst 2960 and 2960-S Switch Software Configuration Guide
OL-8603-09
Chapter 9 Configuring Switch-Based Authentication
Protecting Access to Privileged EXEC Commands
Setting a Telnet Password for a Terminal Line
When you power-up your switch for the first time, an automatic setup program runs to assign IP
information and to create a default configuration for continued use. The setup program also prompts you
to configure your switch for Telnet access through a password. If you did not configure this password
during the setup program, you can configure it now through the command-line interface (CLI).
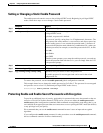
Beginning in privileged EXEC mode, follow these steps to configure your switch for Telnet access:
To remove the password, use the no password global configuration command.
This example shows how to set the Telnet password to let45me67in89:
Switch(config)# line vty 10
Switch(config-line)# password let45me67in89
Command Purpose
Step 1
Attach a PC or workstation with emulation software to the switch console
port.
The default data characteristics of the console port are 9600, 8, 1, no
parity. You might need to press the Return key several times to see the
command-line prompt.
Step 2
enable password password Enter privileged EXEC mode.
Step 3
configure terminal Enter global configuration mode.
Step 4
line vty 0 15 Configure the number of Telnet sessions (lines), and enter line
configuration mode.
There are 16 possible sessions on a command-capable switch. The 0
and 15 mean that you are configuring all 16 possible Telnet sessions.
Step 5
password password Enter a Telnet password for the line or lines.
For password, specify a string from 1 to 25 alphanumeric characters. The
string cannot start with a number, is case sensitive, and allows spaces but
ignores leading spaces. By default, no password is defined.
Step 6
end Return to privileged EXEC mode.
Step 7
show running-config Verify your entries.
The password is listed under the command line vty 0 15.
Step 8
copy running-config startup-config (Optional) Save your entries in the configuration file.


