


7. Click Modify .
The Modify Snapshot dialog box appears.
8. To retain all snapshots that are created by the snapshot schedule indefinitely, clear the Retain each
snapshot for check box.
9. To define an expiration period for the snapshots that are created by the snapshot schedule in the
future, select the Retain each snapshot for check box and specify the retention period for snapshots
in minutes, hours, days, or weeks.
10. Click OK.
Deleting a Snapshot
Delete a snapshot if you no longer need the point‐in‐time copy of the data.
1. Click the NAS Volumes tab on the left.
2. Click the All NAS Volumes tab on the top.
3. In the All NAS Volumes pane, click in the row of the volume whose snapshot schedule you want
to modify.
4. Click View Details.
5. Click the Snapshots tab on the top.
6. In the Snapshots pane, click in the row of the snapshot you want to rename.
7. Click Delete .
The Delete dialog box appears.
8. Click OK.
Restoring Data from a Snapshot
You can restore data in two ways:
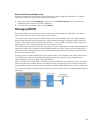
• Restore individual files: Once a snapshot is created, the FluidFS cluster creates a client‐ accessible
snapshots directory containing a copy of the files included in the snapshot. Clients can easily restore
individual files from a snapshot using copy and paste, without storage administrator intervention. This
method is useful for the day‐to‐day restore actions of individual files.
• Restore a NAS Volume from a snapshot: The storage administrator can restore an entire NAS volume
where copy and paste of huge amounts of data would take significant time. This method is useful in
the case of an application error or virus attack.
Snapshots retain the same security style as the active file system. Therefore, even when using snapshots,
clients can access only their own files based on existing permissions. The data available when accessing a
specific snapshot is at the level of the specific share and its subdirectories, ensuring that users cannot
access other parts of the file system.
Viewing Available Snapshots
View the snapshots available for restoring data.
1. Click the NAS Volumes tab on the left.
2. Click the All NAS Volumes tab on the top.
3. In the All NAS Volumes pane, click in the row of the volume whose snapshot schedule you want
to modify.
4. Click View Details.
127