


53
EN
(English)
Filter
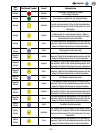
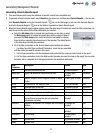
Parameter
Description Default Type
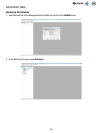
User User who did the test. All users included List
Sample ID Sample ID as defined in the Samples tab of the
Setup window.
All sample IDs
included
Text
Sample Type * Optional field All sample types
included
List
Description * Optional field All descriptions
included
Text
Product * Optional field All products included Text
Brand * Optional field All brands included Text
Lot Number * Optional field All lot numbers
included
Text
Line * Optional field All lines included Text
Customer * Optional field All plants included Text
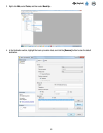
* These fields are customizable during software installation. This table shows the default field names and. If these fields
were customized during installation both the field names and the field types in the Search Report window could be different.
Hidden fields are not shown in the Search Report window.
1. Click the [Generate] button after selecting and entering the filters you want to use. You can also click the [Cancel]
button to return to the Start Page without generating a report. This query must scan a large amount of data, and it
could return a large number of results. Generating this report could take significant time and produce a large amount of
information.
2. A loading indicator appears while the 3M Molecular Detection Software generates the print preview for
display on the screen. Refer to the Appendix for an example of this report.
3. Click the [Print] button at the top of the window to print the report.
4. To save the Samples report, click the [Export] button then select a file format from the list (Microsoft Excel, Adobe
PDF and Microsoft Word). When the Windows Save As dialog opens, select a folder in which to store the file and click the
[Save] button.
Generating an Assay Kits report
1. To generate an Assay (Kit) Lot report, select Reports on the menu bar, and then select Assay Kits… You can also click
Generate Reports next to the Generate Reports icon on the Start page, or your can click Generate Reports next to
the Generate Reports icon on the Sidebar to generate an Assay Kits report.
2. Select Assay Kits… from the list of reports that appears.
3. When the Assay Kits report window appears, select the date range to include and
select the filter parameters you want to use and the values for the filter parameters
you selected.
a. Select the All dates option to include test results done on any date, or
select the Date range option to include test results done within a range of
dates. If you select the Date range option, enter the start and end dates by
entering them directly or selecting them though use of the calendar. The
default option is the date range including the past week.
b. The filter parameters on the Assay Kits report window are both optional. Click the dropdown menu and select the
value you want include in the Assay Kits eport. The defaults are all users and all assay types.