


31
EN
(English)
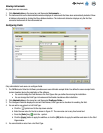
Adding samples
1. Samples are the food or environmental samples that you are testing for the presence of pathogen.
2. Click Manage on the menu bar, and then select Samples…. You can also select Manage Samples on the Sidebar, or
select the Samples tab if the Manage window is already open. You can also import Sample information. Refer to the
section in this manual on Importing/Exporting samples for more information.
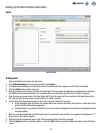
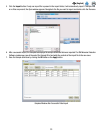
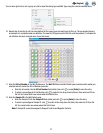
3. The Setup window displays a list of the current Sample IDs on the Samples tab, along with the custom field values for
each Sample ID.
4. Click the Add button to insert a new row at the bottom of the list of Sample IDs.
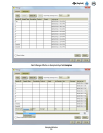
5. Enter the new Sample ID into the Sample ID column of the new row. The Sample ID is required and it must be unique.
6. Enter values for the custom fields into the new row in the column corresponding to each custom field. The custom fields
are optional. Sample Type field is a list field, and the other custom fields are text fields.
7. Click the [Apply] button to apply the addition, or click the [OK] button to apply the addition and return to the Start
Page window.
Modifying samples
Only administrator level users can manage samples. You can only modify samples if they have never been used in a run.
1. Click Manage on the menu bar, and then select Samples…. You can also select Manage Samples on the Sidebar, or
select the Samples tab if the Manage window is already open.
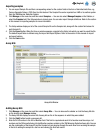
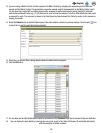
2. The Setup window displays a list of the current Sample IDs on the Samples tab, along with the custom field values for
each Sample ID.
3. Click the field (Sample ID, Sample Type, or custom field) that you want to modify. Use the vertical scroll bar to display
additional Samples if necessary.
4. Enter the modification into the field you want to modify. The Sample ID is required and it must be unique. The custom
fields are optional. Sample Type field is a list field, and the other custom fields are text fields.
5. Click the [Apply] button to apply the change, or click the [OK] button to apply the change and return to the Start Page window.
Deleting samples
Only administrator level users can manage samples. You can only delete samples if they have never been used in a run.
1. Click Manage on the menu bar, and then select Samples…. You can also select Manage Samples on the Sidebar, or
select the Samples tab if the Manage window is already open.
2. The Manage window displays a list of the current Sample IDs on the Samples tab, along with the custom field values for
each Sample ID.
3. Click the Sample ID that you want to delete. Use the vertical scroll bar to display additional Samples if necessary. Do not
delete a Sample ID that has been used in a test run. Hide a Sample ID that you no longer need. Refer to the section in
this manual on Hiding samples for more information.
4. Select the Delete button to delete the selected Sample ID.
5. Click the [Apply] button to apply the deletion, or click the [OK] button to apply the deletion and return to the Start
Page window.
Hiding samples
Only administrator level users can manage samples. Hide Sample IDs from view when you no longer test those Sample IDs,
and you want to minimize the number of Sample IDs that appear in the displays. Delete Sample IDs when you no longer use
those sample IDs and the Sample IDs have never been used in a test run. Refer to the section in this manual on Deleting
samples for more information.
1. Click Manage on the menu bar, and then select Samples…. You can also select Manage Samples on the Sidebar, or
select the Samples tab if the Manage window is already open.
2. The Manage window displays a list of the current Sample IDs on the Samples tab, along with the custom field values for
each Sample ID.