


34
EN
(English)
Exporting samples
1. You can export Sample IDs and their corresponding values for the custom fields in the form of delimited data files, e.g.,
Comma Separated Values (.CSV) files. Use this feature if the Sample IDs can be imported to a LIMS or to another system
from the 3M Molecular Detection System.
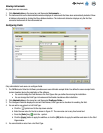
2. Click Manage on the menu bar, and then select Samples…. You can also select Manage Samples on the Sidebar, or
select the Samples tab if the Setup window is already open. You can also import Sample definitions. Refer to the section
in this manual on importing samples for more information.
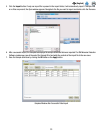
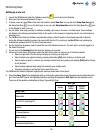
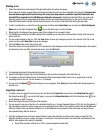
3. The Setup window displays a list of the current Sample IDs on the Samples tab, along with the custom field values for
each Sample ID.
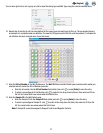
4. Click the Export button. When the Save as window appears, navigate to the folder into which you want to export the file.
The default export folder is defined using the Import and Export Options. Refer to the section in this manual on import
and export options.
5. Click the Save button.
Assay Kits
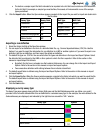
Assay Kits Window
Adding Assay Kits
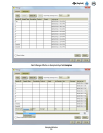
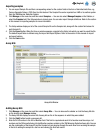
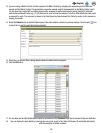
1. Click Manage on the menu bar, and then select Assay Kits…. You can also use the sidebar or click the Assay Kits tab
on the already open Manage window.
2. The Assay Kits tab displays a current list of assay kits on the in the sequence in which they were added.
3. Click the [Add] button to add a new assay kit.
4. Enter the kit lot number in the Kit Lot Number field. This field is required and each kit lot number must be unique. Lot
numbers are the 3M manufacturing lot identification numbers printed on the 3M Molecular Detection Assay kits. You can
use the combination of the Assay Kit and the Sample to track samples through the work flow from receiving the sample
in the lab to adding the sample to a test run and viewing the final test results.