


Teledyne API Model 200AU NO
X
Analyzer Instruction Manual, 02293, Rev. F
8-17
4. Remove the board, laying it down on an insulating surface such that the board edge pins
on the PCB are on the left. The PROM chip should be at the top center. The current chip
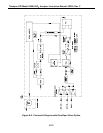
should be labeled with something like "2AUC8…". See Figure 9-2 for prom location. Gently
pry the chip from its socket and replace it with the new chip. Install the chip in the left end of
the socket with the notch facing to the right. Make sure that all of the legs insert into the
socket correctly.
5. Re-attach the CPU board to the V/F board, and re-attach the assembly to the
motherboard.
6. Turn the M200AU ON and observe the front panel display. As the machine goes through
the setup the version number will be displayed on the front panel. It should read the same as
the version number printed on the prom.
7. Re-enter any non-default settings such as RANGE or AUTOCAL. Re-enter the SPAN
values in the CAL-CONC menu. Check all settings to make sure that expected setup
parameters are present.
8. Re-calibrate the Analyzer so that the default slope and intercept are overwritten with the
correct values.