


PathBuilder S24x, 26x, and 27x Switch Hardware Installation 3-5
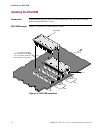
Installing the DSU DIM
Install the DSU DIM Perform these steps to install the DSU DIM:
Caution
Be sure that the telephone company plug is disconnected before you disconnect the
EIM from the PathBuilder S24x, 26x, and 27x switch. Also, do not connect the
telephone company plug to the EIM until you have connected the EIM to the
PathBuilder S24x, 26x, and 27x switch.
Mise en Garde
Assurez-vous que la prise de téléphone est débranchée avant de déconnecter le
module d’interface externe (EIM) du PathBuilder S24x, 26x, and 27x switch. Ne la
rebranchez pas au EIM avant d’avoir reconnecté le module au PathBuilder S24x,
26x, and 27x switch.
Vorsicht
Das Telefonkabel muß ausgesteckt sein, bevor Sie die Verbindung zwischen dem
EIM und dem PathBuilder S24x, 26x, and 27x switch trennen. Schließen Sie das
Telefonkabel erst dann wieder in das EIM an, wenn Sie die Verbindung zwischen
EIM und PathBuilder S24x, 26x, and 27x switch wiederhergestellt haben.
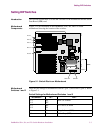
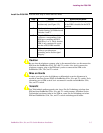
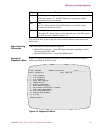
Step Action Result/Description
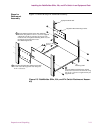
1 Install the DSU DIM in the DTE
position only (see Figure 3-2).
The DSU option does not operate
if the DIM is installed in the DCE
position.
2 Set the switches properly. Refer to
“Switch Settings for Motherboard
Switches 1 and 2.”
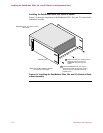
3 Plug the EIM into the backplane
connector corresponding to the
DIM port containing the DSU
DIM (Port 1 or 2). Verify that the
EIM is only connected to a port
that has a DSU DIM installed.
4 Tighten the connector mounting
screws to provide proper
grounding and to ensure signal
integrity.