


3. Physical installation
3.4 Alignment of a ceiling mount FLM projector
Necessary tools
17 mm open ended spanner.
How to align a ceiling mount FLM projector ?
1. Install the projector in the desired location. See installation procedure "Suspension of the FLM projector with rigging clamps",
page 26. Take into account the zoom range of the used lens and the size of the screen.
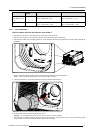
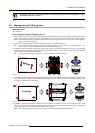
2. Project one of the internal hatch patterns on the screen.
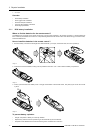
3. Release the lock nut (ref B image 3-25) of the rigging clamps.
4. Adjust the height of the rigging clamps with respect to the projector, untilthe projected hatch pattern is perfectly rectangle shaped
and leveled.
B
Image 3-25
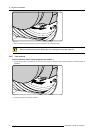
When this is achieved, the projector is set horizontal and vertical at right angles to the screen.
SCREEN
SCREEN
Image 3-26
5. Fasten the lock nut (B) of the rigging clamps.
3.5 Suspension of the FLM projector with rigging clamps
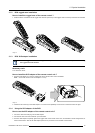
Rigging points and rigging clamps
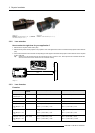
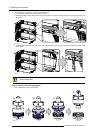
The carrying handle, at the bottom side of the projector, is provided with eight slots. Four slots are longitudinally (A) oriented and
four slots are transversely (B) oriented. Each slot contains a rigging point of which the position in the slot can be adjusted depending
on the size of the truss installation. The rigging clamps (C) can be attached to those rigging points, which allows an easy and fast
physical setup of the projector in a hanging configuration.
A
B
C
Image 3-27
Necessary tools
• 24 mm open ended spanner.
• 17 mm open ended spanner.
26
R5976986 FLM HD18 15/03/2010