


3. Physical installation
3. PHYSICAL INSTALLATION
About this chapter
This chapter explains how to install and set up your FLM projector. If you are familiar with the projector and want to quickly set it
up for temporary use, follow the “Quick setup” instructions below. For a more complete setup, follow the instructions and guides
covered in the remaining subsections.
Quick setup
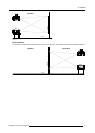
The following steps describe briefly how to setup your FLM projector in a table mount front projection. Note that each step refers to
a corresponding procedure, which is more detailed and illustrated.
1. Install the batteries of the remote control, see "RCU battery installation", page 18.
2. Place the projector on a solid table in front of the screen at the expected throw distance. Ensure that the projector is installed
at right angles (horizontally and vertically) with the screen.
3. Select and install an appropriate lens, which covers the throw ratio ( = screen size / projector screen distance). For more details
see "Lens selection", page 22, and "Lens installation", page 23.
4. Connect the projector with the local power net, see "Power connection", page 35.
5. Connect your source to the appropriate input module, see "Input source connections", page 37.
6. Switch ON the projector, see procedure"Switching on", page 45.
7. Select the input slot at which your source is connected with. Do this by pressing the numeric key “1”, “2”, “3” or “4” on the
remote control unit or on the local keypad, see chapter "Source selection", page 53.
8. Zoom and shift the lens until the image is properly projected on the screen, Do this by using the “ZOOM” and “FOCUS” key on
the remote control unit or on the local keypad, see"Quick Lens Adjustment via LENS key", page 49 or "Direct Lens Adjustment
(RCU)", page 50. If necessary, level the projector from side to side by turning the adjustable feet in or out, see "Alignment of a
table mount FLM projector", page 25.
Overview
• Remote control unit (RCU)
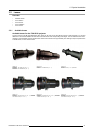
• Lenses
• Alignment of a table mount FLM projector
• Alignment of a ceiling mount FLM projector
• Suspension of the FLM projector with rigging clamps
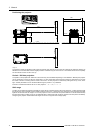
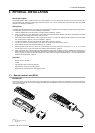
3.1 Remote control unit (RCU)
Introduction
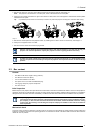
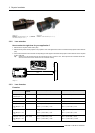
The remote control unit (A) of the FLM projector is equipped w
ith a rugged case (B) and an XLR adaptor (C). The remote control
unit can be used wired via mini-jack or via rugged XLR. Note that the backlight, of the remote control unit, illuminate continuously
when wire connected.
C
B
A
Image 3-1
A Remote control unit (RCU).
B Rugged case.
R5976986 FLM HD18 15/03/2010 17