


EN-63
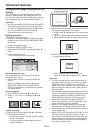
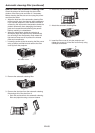
Control by a control panel, etc.
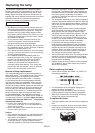
When installing the projector in a place where the remote control signals cannot reach the projector, you can control
the projector using a control panel or other device connected to the REMOTE 1 IN terminal.
ON
POWER
COMPUTER1
OFF
ON
BLANK
OFF
Remote control
External contact
control
COMPUTER2
VIDEO S-VIDEO
DVI
Projector
Control panel
Controllable functions
• Switchingbetweenremotecontrolandexternal
control
• Switchinginputsignals
• Power-onandpower-off
• BLANK-onandBLANK-off
Important:
• To control the projector using a control panel, set
STANDBY MODE in the INSTALLATION 1 menu to
STANDARD. When it is LOW, you cannot control
the projector.
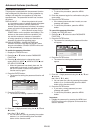
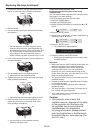
Connection
• Make sure that the power supplies of the projector
and control panel are off.
To REMOTE 1 IN
RS-232C cable (option)
Control panel
1. Connect one end of an RS-232C cable to the
REMOTE 1 IN terminal on the projector.
2. Connect the other end of the RS-232C cable to the
control panel.
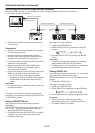
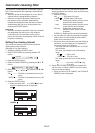
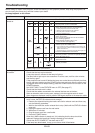
Pin functions (defaults)
REMOTE 1 IN (D-SUB 9-pin)
Pin No.
Signal Open (H) Short (L)
1 GND – GND
2 POWER OFF ON
3 Input – COMPUTER1
4 Input – COMPUTER2
5 Input – VIDEO
6 Input – S-VIDEO
7 Input – DVI
8 BLANK OFF ON
9 ON/OFF Valid (Remote control) Invalid (External contact control)
• You can change the functions of PIN 2 to PIN 8
using REMOTE 1 MODE in the INSTALLATION 2
menu. See page 35.
Important:
• To reset the pin functions to the defaults, set
REMOTE 1 MODE in the INSTALLATION 2 to
RESET.
Contact control
By short-circuiting Pin No. 1 and Pin No. 9, you can
control the projector using a control panel or other
device.
• When you short-circuit Pin No. 1 and Pin No. 9, the
following functions cannot be used:
∙ POWER and BLANK of the remote control and
the projector
∙ RS-232C commands and network functions
corresponding to the above-mentioned
functions
∙ REMOTE 1 MODE, AUTO POWER ON and
AUTO POWER OFF in the INSTALLATION 2
menu.
∙ STANDBY MODE in the INSTALLATION 1 menu.
Input switching control
By short-circuiting any of Pin No. 3 to Pin No. 7, you
can switch the input using a control panel or other
device.
• When short-circuiting any of Pin No. 3 to Pin No. 7,
you cannot use the following functions.
∙ POWER, BLANK, COMPUTER 1, COMPUTER 2,
VIDEO, S-VIDEO, DVI, and HDMI of the remote
control and the projector
∙ RS-232C commands and network functions
corresponding to the above-mentioned
functions
POWER control
By short-circuiting or open-circuiting Pin No. 2, you
can turn on or off the power using a control panel or
other device.
BLANK control
By short-circuiting or open-circuiting Pin No. 8, you
can turn on or off the BLANK function using a control
panel or other device.
Advanced features (continued)