


EN-35
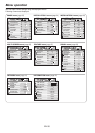
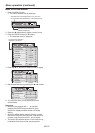
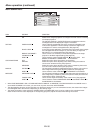
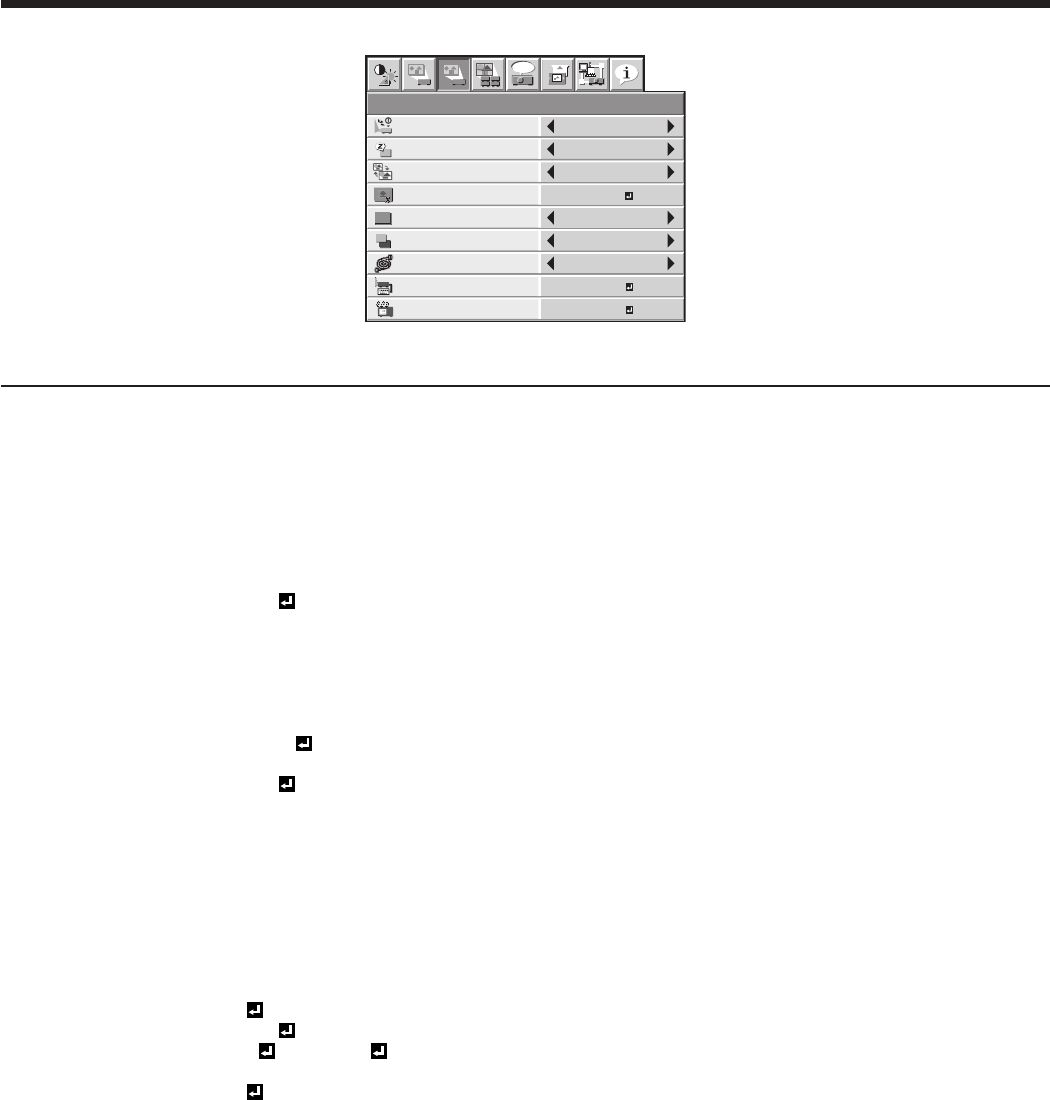
INSTALLATION 2 menu
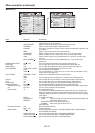
REMOTE 1 MODE
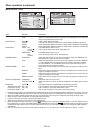
FILTER MENU
INSTALLATION 2
AUTO POWER ON
AUTO POWER OFF
OFF
ON
BLUE
AUTO
5min
IMAGE CAPTURE
SPLASH SCREEN
DVI LONG CABLE
BACK COLOR
1
1
2
2
opt.
ON
ENTER
ENTER
SETUP
SCREEN
4:3
ITEM SETTING FUNCTION
AUTO POWER ON ON / OFF When ON is chosen, the projector is automatically turn on when the power
cord is plugged in the wall outlet. Choose ON when using the projector
mounted on the ceiling.
• Theprojectorisinthestand-bymodewhenthelampisoff.Usethe
remote control to turn on the lamp.
AUTO POWER OFF OFF / 5min-8hour When no video signal is input and no operation is made, the projector
automatically turns off after the selected time period. A dialog is displayed 5
minutes before the projector turns off.
SCREEN 16:9 Select this setting when using a 16:9 screen.
4:3 Select this setting when using a 4:3 screen.
IMAGE CAPTURE SETUP Use to capture the screen for the splash screen. (See page 57.)
SPLASH SCREEN ON / OFF Choose ON to display the splash screen when the power is turned on.
• Thesplashscreencanbechanged.(Seepage57.)
BACK COLOR BLUE / BLACK /
IMAGE
Use to select the background from among BLUE, BLACK and IMAGE, which
will be displayed when there is no signal input from the source. When IMAGE
is selected, the splash screen will be displayed.
DVI LONG CABLE AUTO Select this option for normal use.
MANUAL Use to adjust the amount of transmission signal correction when a long DVI
cable is used.
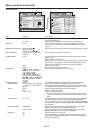
REMOTE 1 MODE ENTER Select when controlling the projector by a control panel connected to the
REMOTE 1 IN terminal. (See page 63.)
PIN 1 GND Unchangeable. (Fixed.)
PIN 2 POWER / NONE Select POWER or NONE.
PIN 3 COMPUTER 1 You can assign COMPUTER 1, COMPUTER 2, VIDEO, S-VIDEO, DVI, HDMI,
or NONE to each pin. Though the assignment can be duplicated, the pins
so assigned become invalid and their settings are displayed with asterisks at
both ends (like “*COMPUTER 1*”).
PIN 4 COMPUTER 2
PIN 5 VIDEO
PIN 6 S-VIDEO
PIN 7 DVI
PIN 8 BLANK / NONE Select BLANK or NONE.
PIN 9 ON/OFF Unchangeable. (Fixed.)
RESET OK Settings are reset to the defaults.
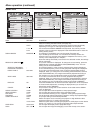
FILTER MENU ENTER The filter menu for the following settings is displayed.
CLEANUP PERIOD 24H / 1 WEEK
/
OFF
You can set the filter cleaning interval. (See page 67.)
MANUAL CLEANUP OK Select this option to clean the filter immediately.
• Youcan’tsetIMAGECAPTUREandSPLASHSCREENwhenPASSWORDFUNCTIONintheFEATUREmenuhasbeensetto
SPLASH ID SCREEN to enable the password lock.
• WhenyousetBACKCOLORtoIMAGEanddisplaythesplashscreen(startupscreen)foralongtimeofperiod,theafter-image
may remain on the screen. Consult your dealer in this case.
• Don’tadjustthelensfrequentlywithBACKCOLORsettoIMAGE.
• WhenSTANDBYMODEintheINSTALLATION1menuisLOW,youcannotselectREMOTE1MODE.
Menu operation (continued)