


53
OWNER’S MANUAL
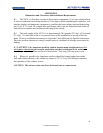
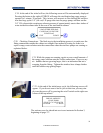
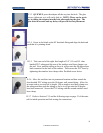
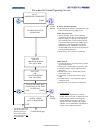
C.17 Press the button next to START and the sterilizer will perform a self test on the
cabinet ventilation pump.
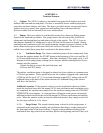
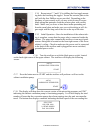
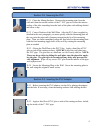
C.16 Turn the sterilizer on with the black power switch located
on the back right corner of the upper cabinet. The sterilizer will display the following
screen:
AN74 I
ANPROLENE STERILIZER
START
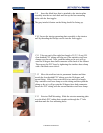
C.14 Repeat steps C.7 and C.8 by drilling the four toggle mount-
ing holes and inserting the toggles. Secure the exterior plate to the
wall with the four Phillips screws provided. Depending on the
thickness of your exterior wall, you may wish to trim off excess
black tubing that protrudes from the exterior plate with a utility
knife. Make sure you leave at least three inches protruding out
from the metal plate and make sure you cut the tubing at a 45 de-
gree angle with the long end of the cut on the top of the tube.
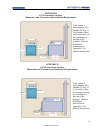
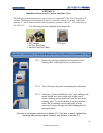
C.15 Initial Operation - Once the installation of the exhaust tub-
ing is complete, ensure that the purge tube is connected inside the
cabinet. The purge tube connects the sterilizer via an acetyl quick
connect fitting that is located on the front right corner of the lower
cabinet’s ceiling. Check to make sure the power cord is connected
to the back of the sterilizer and is plugged into an un-switched,
grounded power outlet.
AN74 I
ANPROLENE STERILIZER
START
C.18. The display will then show the current version of the microchip program, and “OK”
indicating the cabinet ventilation pump is functioning properly. It will also display the total
number of hours that the evacuation pumps have been running since the unit was manufac-
tured. The bottom line displays a number indicating the blade speed of the rear cooling fan.
SELF TEST
OK (VER. 4.04)
16 PUMP HOURS
FAN 100 % RPM
© Andersen Products Ltd