


MX49/MX61 Owner’s Manual
Controls and Functions
11
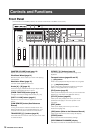
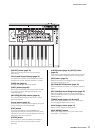
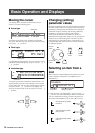
[SELECT] button (page 24)
Calls up the display from which you can select a
Performance.
LCD (Liquid Crystal Display) (page 14)
The backlit LCD indicates the parameters and values
related to the currently selected operation or function.
[DATA] dial (page 16)
Changes the selected value in the display.
[SHIFT] button (page 39)
Pressing this button along with another button enables
you to execute various alternate commands of the
respective buttons.
[INC/YES]/[DEC/NO] buttons (page 16)
For increasing/decreasing the value of the currently
selected parameter.
Cursor buttons (page 16)
These move the “cursor” around the display, and scroll
through the pages of the edited display.
[EXIT] button
The menus and displays of the MX49/MX61 are
organized according to a hierarchical structure. Press
this button to exit from the current display and return to
the previous level in the hierarchy.
[ENTER] button
Use this button to select the display to be edited, to
define the value, and to execute a Job or a Store
operation.
[LAYER] button (page 19), [SPLIT] button
(page 20)
These buttons respectively layer different Voices of Parts
1 and 2, and split the keyboard into left and right parts.
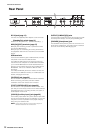
[ARP] button (page 22)
Determines whether the Arpeggio function is applied to
the entire Performance or not.
[RHYTHM PATTERN] button (page 25)
Calls up the display from which you can select a Rhythm
Pattern.
[EXT. SONG] (External Song) button (page 27)
Calls up the display from which you can select Song
data of the USB flash memory connected to the USB [TO
DEVICE] terminal.
[TEMPO] button (pages 23, 26 and 27)
Calls up the display from which you can set the tempo
for the Arpeggio/ Rhythm Pattern/ Song.
Voice Category button (page 18)
Selects a Voice category for Part 1/Part2.
[PART SELECT] button
Calls up the display from which you can select a Part
from Parts 1 – 16 and play it.
C5 C6