


Digital Dosing Units
26
2. Place the Digital Dosing unit into operation by pressing the Run key ( ).
The green LED will light when the unit is ready to dose, but will not feed until
the extruder begins operation.
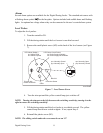
3. Start the extruder. The Digital Dosing unit will begin dosing material as soon as
the extruder starts. If the unit is installed properly, the process machine symbol
will light on the controller when the extruder starts. The disc symbol will
light when the Digital Dosing is dosing material
4. To stop the dosing process while the extruder is operating, press . The
Digital Dosing unit will automatically stop dosing when the extruder stops.
5. While the unit is dosing, depending on software revision, the current recipe can
be viewed but not modified, by pressing . In some software versions, the
percent additive can be changed while the unit is dosing. The actual extruder
screw speed will be displayed in the third recipe register.
3.6 Calibration
All feeders must be calibrated before any blending recipes can run using the Digital Dosing
additive feeder.
NOTE: The calibration weight (metered material weight for one revolution of the dosing
disc) must be determined separately for each material to be dosed since calibration
weight differs from material to material.
The following equipment is needed for calculating the calibration weight:
• Scale with a minimum accuracy of 0.01 grams
• The weighing container which is included in the equipment delivery
Follow these procedures:
1. Remove one of the square covers and insert the calibration container provided.
2. Fill the dosing hopper with a minimum of six (6) inches of material.
3. Note weight of weighing container (= tare weight) or tare scale to zero
NOTE: The Digital Dosing station may only be operated if all sample chutes are in place or
a collecting bin is in the calibration box.