


20
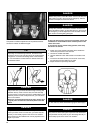
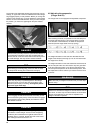
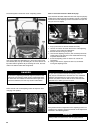
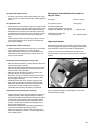
The brake system involves the use of 3 adjusting screws:
One on the brake force distributor (G1), and one on each of the
drum brakes (G2, G3). By unscrewing G1, the inner cable in the
top brake cable is tightened. By unscrewing G2 or G3, the inner
cable in the bottom brake cable is tightened.
DANGER
Do not use any adjusting screw that might be present on the
brake lever. Unscrewing it would result in inadmissible limita-
tion of the free room needed for the brake cable nipple in the
brake force distributor, and this may result in brake failure.
There are lock nuts on all adjusting screws to stop them from
changing their position.
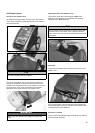
Case 1: Too much increase in brake lever play:
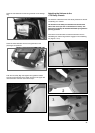
First check that all brake cables with their end caps are properly
located in the relevant hole of the adjusting screws. If necessary
do the same for the adjusting screw on the brake lever (the one
that you are not to adjust).
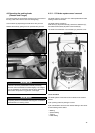
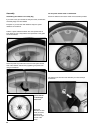
Prop up the carrier so that the wheels turn freely.
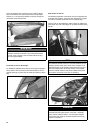
Use a 8 mm wrench to loosen the lock nut of the adjusting
screw G1 on the brake force distributor.
Set both wheels turning very slowly.
Unscrew the adjusting screw G1 (anti clockwise) until there
is light braking of at least one of the wheels without having
to operate the brake lever.
Screw the adjusting screw G1 back in for one full turn
(clockwise).
Using a 8mm wrench, tighten the lock nut, but without
moving the adjusting screw.
1.
2.
3.
4.
5.
6.
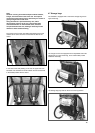
DANGER
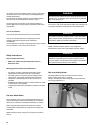
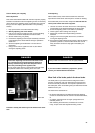
As you do this, please note that the adjusting screw G1
may only be unscrewed to a maximum of 3 mm, measured
between the tightened lock nut and screw head. If this is
not the case, there is the risk that the screw will shear with
potential loss of braking force as a result.
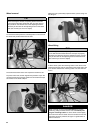
If the possible extent of adjustment of the adjusting screw G1 is
insuffi cient, the adjusting screws G2 and G3 can be adjusted as
described in the following section.
DANGER
Always make sure that the lock nuts are tightly fastened.
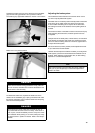
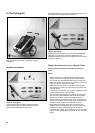
wrong
right