


Additional options
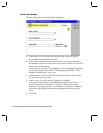
1. In the “Servers to Install Course on” field, enter the names of each server
where the course databases will be replicated. Separate each server
name with a comma.
If your site uses hierarchical names, make sure you use the full hierarchical
name for each server (for example: ServerWest/Acme/Education). Click
the pop-up list button to select servers from the Name & Address
books. In the dialog box that appears, click the pop-up list button at the
top to switch between the Name & Address books.
Central creates a new replica of the course databases on the servers
specified in the list.
Important
You must have “Create new replicas” access to the servers
where you want to create replicas. This is set in the server document in
the Name & Address book. For more information, see the Notes
Administrator’s Guide.
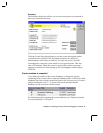
2. Click the Default Access list box to change the default access.
The choices are: No Access, Reader, or Author.
This field sets the default access to the course databases. Select No Access
to create a course environment closed to everyone except enrolled students.
Select Reader as the default access to allow anyone to audit the course,
but not participate in course discussions and work. Select Author as the
default access to create an open course environment, accessible to
anyone with access to the Notes server.
For more information about database access, see Notes Help.
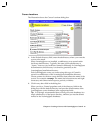
3. If you want to add the course databases to your Notes workspace, select
the option labeled “Click here to add database icons to Notes desktop.”
If you do not add the icons to your workspace now, you can do so later
either manually or using Central.
4. If you do not want to create the course databases right now, select the
option labeled “Click here to defer the creation of the course databases.”
This option is helpful if you are not currently connected to the server.
For example, if you are working from a laptop, you might want to defer
the creation of the databases until the next time you connect to the
server. For information about creating the course once you are connected
to the server, see “Deferred creation of course databases” in Chapter 5.
5. Click OK.
24 LearningSpace Installation and Administration Guide