


customization library. The new design library will be based on the
existing default design library, so whatever changes you have made to
the default library will serve as the starting point for the new library.
Note The design of the new course will not be updated with the design
library until the template refresh process is run on the server. Usually,
this takes place overnight. However, to manually run the process, you
select each of the new course databases on the Notes workspace, then
choose File - Database - Refresh.
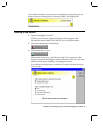
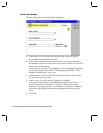
3. If you want to enter a Course Description, deselect the “Defer entering of
full course description” option. If you want to create the description later
(or allow the course designer to create it), leave this option selected.
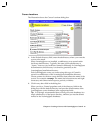
4. Select the “Detach the LearningSpace DLL if needed” option.
The Dynamic Link Library (DLL) allows LearningSpace to know where
you put custom design libraries in the directory structure. This option
causes the DLL file to be written to your computer’s hard drive if: 1) you
chose to use a customization library for the course; and 2) the DLL is not
already on your computer.
5. Click OK.
6. If, in step 3, you chose to create a course description, the Course
Description document opens so you can enter the description.
The course description is a Rich Text field that allows you to use various
font styles, add images, and so on.
When you are done, click the “Click to continue creating the course”
button.
CoursePack filename
If you have chosen to create a new course from an existing CoursePack, you
are prompted for the name of the CoursePack file. Course packs are stored in
the “lspack” subdirectory of the directory in which you installed Central.
1. Enter the name of the CoursePack file.
2. Click OK.
Chapter 3: Creating a Course with LearningSpace Central 17