


ASSEMBLY
INSTRUCTIONS
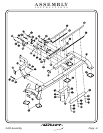
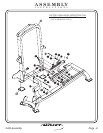
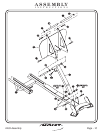
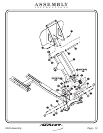
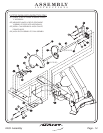
FRAME ASSEMBLY
Step 2a
FITNESS SYSTEMS
R
HOIST
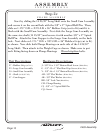
2 - Running Base Assembly
3 - Front Attachment Assembly
4 - Seat Slide Adjuster
5 - Seat Adjustment, Rear Mount
6 - Seat Adjuster, Front Mount
7 - Seat Adjustment, Front Mount Lower
8 - 2” x 4” End Cap
9 - 2” x 4” End Cap
10 - Rubber Foot Pad
12 - Shaft
13 - Shaft
15 - Long Stand-Off Rail
16 - Short Stand-Off Rail
61 - Plate
62 - Plate
66 - 2” x 2” End Cap
(VH)
(HH)
(Long)
(Short)
(Short)
(Long)
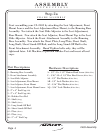
Part Descriptions
A - 1/2”-13 x 1 1/2” Button Head Screw
C - 5/16”-18 x 3 1/4” Hex Head Screw
AA - 1/2” Flat Washer
AB - 1/2” Lock Washer
AC - 5/16” Flat Washer
AQ - 5/16” Lock Washer
(White Zinc)
(White Zinc)
(White Zinc)
(White Zinc)
(White Zinc)
(White Zinc)
Hardware Descriptions
2403 Assembly
Page 5
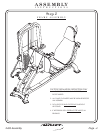
Start assembling your CL-2403 by attaching the Seat Adjustment, Front
Mount Lower and the Seat Adjustment Rear Mount, to the Running Base
Assembly. Next attach the Seat Slide Adjuster to the Seat Adjustment,
Rear Mount. Now attach the Seat Adjuster, Front Mount Top to the Seat
Slide Adjuster. Attach the Front Attachment Assembly to the Running
Base Assembly. Now attach the Short Plate, Long Plate, Short Shaft,
Long Shaft, Short Stand-Off Rail, and the Long Stand-Off Rail to the
Front Attachment Assembly. bolts only, they will be
tightened later. Lift Machine to position Rubber Feet and insert all end
caps.
Hand Tighten