


En
6
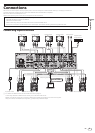
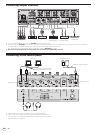
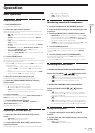
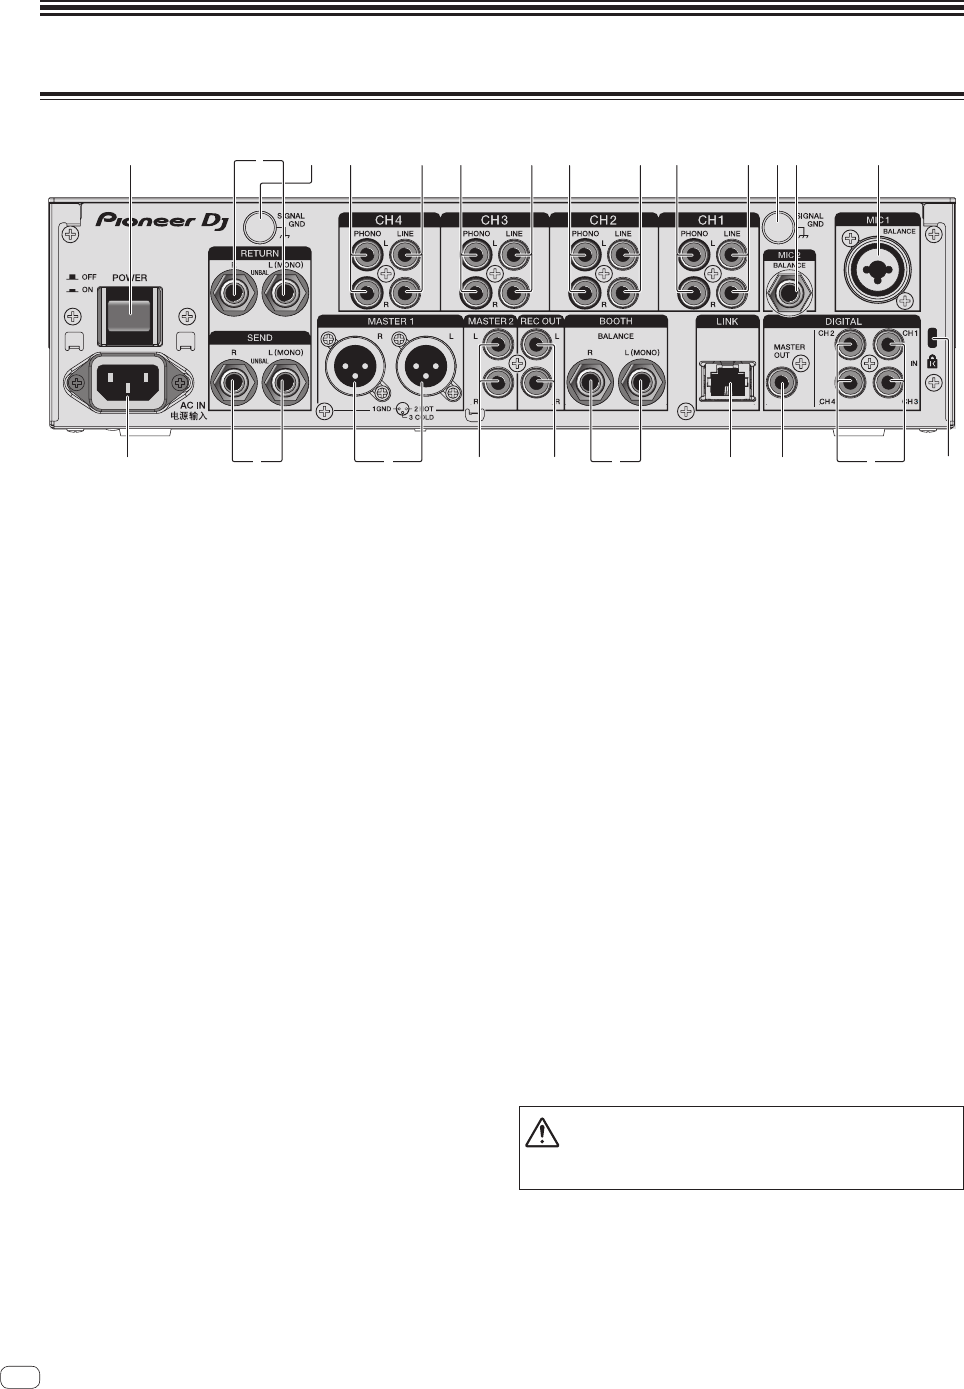
Part names and functions
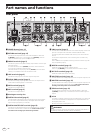
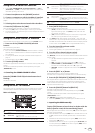
Rear panel
1 34 3443 43 55 6 7
8
2
de abh 9cg f
1 POWER button (page 11 )
Turns this unit’s power on and off.
2 RETURN terminals (page 10 )
Connect to the output terminal of an external effector. When the
[L (MONO)] channel only is connected, the [L (MONO)] channel
input is simultaneously input to the [R] channel.
3 PHONO terminals (page 9 )
Connect to a phono level (MM cartridge) output device. Do not input
line level signals.
To connect a device to the [PHONO] terminals, remove the short-
circuit pin plug inserted in the terminals.
Insert this short-circuit pin plug into the [PHONO] terminals when
nothing is connected to them to cut external noise.
4 LINE terminals (page 9 )
Connect to a DJ player or a line level output component.
5 SIGNAL GND terminal (page 9 )
Connects an analog player’s ground wire here. This helps reduce
noise when the analog player is connected.
6 MIC2 terminal (page 9 )
Connects a microphone here.
7 MIC1 terminal (page 9 )
Connects a microphone here.
8 Kensington security slot
9 DIGITAL IN terminal (page 9 )
Connect these to the digital coaxial output terminals on DJ players,
etc. The sound may be momentarily interrupted when the output
signal sampling frequency is switched.
a DIGITAL MASTER OUT terminal (page 10 )
Connect this to the digital terminal of a preamplifier, etc. It outputs
the master channel audio in SPDIF format. Take careful not to
connect it to an analog input terminal by mistake.
b LINK terminal (page 9 )
Connect this to the LINK terminals of a Pioneer DJ player or the LAN
ports of a computer with rekordbox installed (PRO DJ LINK).
Connecting NXS-GW to PRO DJ LINK allows you to use the KUVO
service.
To connect multiple devices, use a switching hub (commercially
available).
Use a 100Base-TX-compatible switching hub. Some switching hubs
may not operate properly.
c BOOTH terminals (page 10 )
These are output terminals for a booth monitor.
When only [L (MONO)] is connected, monaural audio is output.
d REC OUT terminals (page 10 )
These are output terminals for recording.
e MASTER2 terminals (page 10 )
Connect these to the analog input terminals of a power amplifier, etc.
f MASTER1 terminals (page 10 )
Connect these to the analog input terminals of a power amplifier, etc.
Be sure to use these as balanced outputs. Be careful not to acci-
dentally insert the power cord of another unit.
g SEND terminals (page 10 )
Connect to the input terminal of an external effector. When the
[L (MONO)] channel only is connected, a monaural audio signal is
output.
h AC IN
Connects to a power outlet using the included power cord. Wait until
all connections between the equipment are completed before con-
necting the power cord.
Be sure to use the included power cord.
WARNING
The short-circuit pin plugs out of the reach of children and infants. If
accidentally swallowed, contact a doctor immediately.