En
14
Operating the [X-PAD]
Operating procedure 1
1 Perform steps 1 to 5 of the Using the BEAT FX
function procedure.
2 Touch the [X-PAD].
The two operations of turning the effect on/off and changing the time/
amount parameter of the effect can be performed by touching and slid-
ing a finger on the [X-PAD].
! When you release your finger from the [X-PAD], the effect turns off.
!
To keep the effect on when you release your finger from the [X-PAD],
while touching the [X-PAD] press the [ON/OFF] button of [BEAT FX],
then release your finger from the [X-PAD].
Operating procedure 2
1 Using the BEAT FX functionPerform steps 1 to 6.
2 Touch the [X-PAD].
The time/amount parameter of the effect can be changed by sliding a
finger on the [X-PAD].
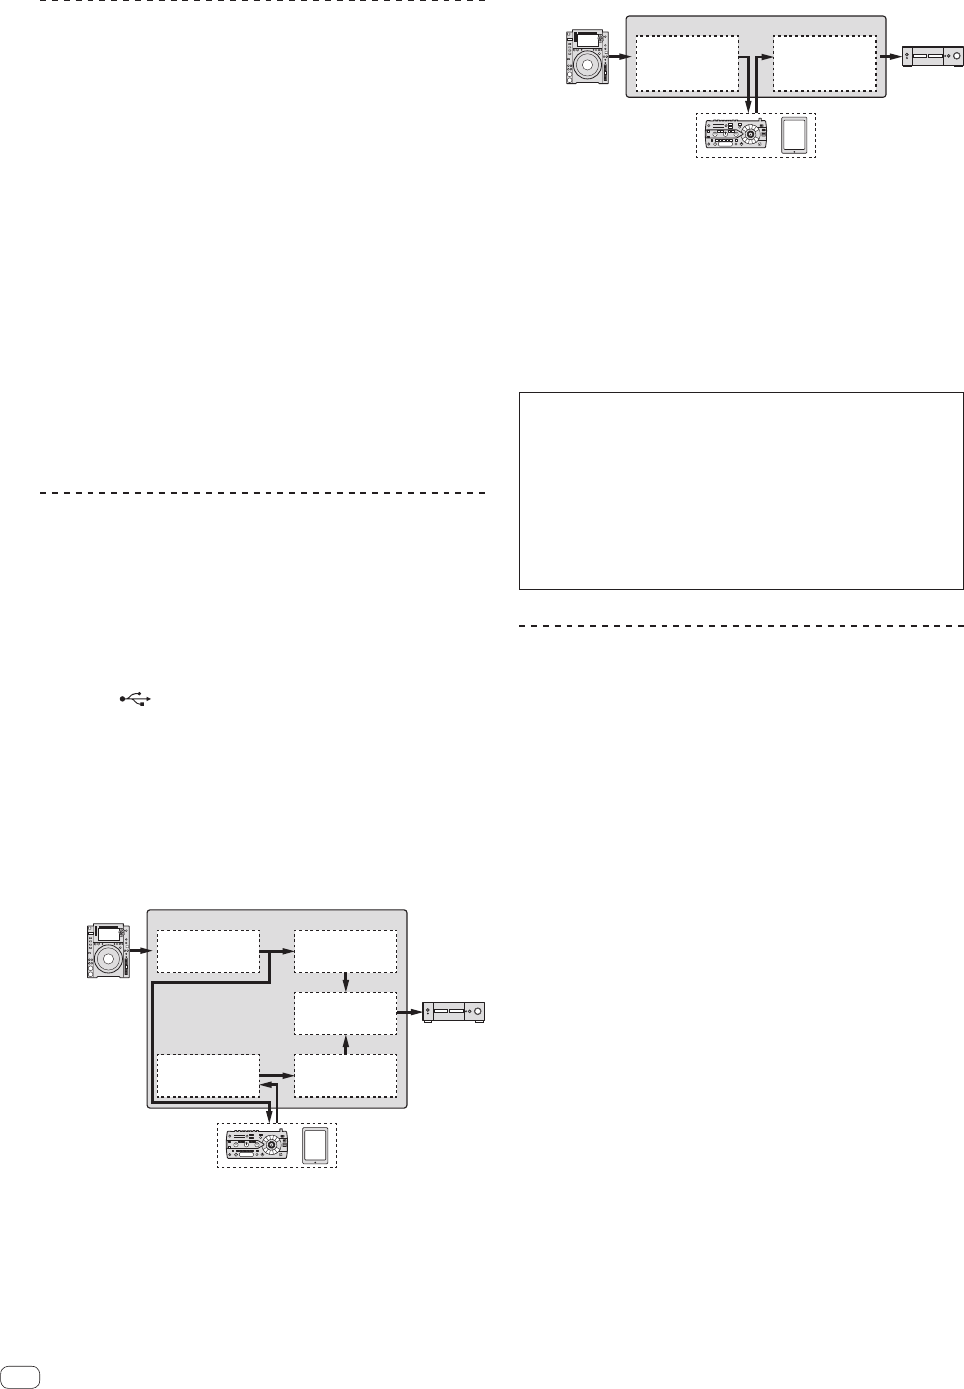
Using the SEND/RETURN function
External effector and mobile devices can be used.
1 Connect this unit and external effector.
For information on connecting, see Connecting output terminals on
page 10 .
2 Switch the [SEND/RETURN] selector switches.
Select the effector to use.
— [1/4” JACK]: Select when using external effector.
— [USB ]: Select when using a mobile device.
3 Switch the [RETURN TYPE] selector switch.
Select the SEND/RETURN method.
— [AUX]: The audio of the channel selected in the effects channel
is input to the external effector (or mobile device), and the output
from the external effector (or mobile device) is input into the
channel selected with [RETURN AUX] using the input selector
switch.
Original sounds and effect sounds can be mixed together as
desired.
External effector /
Mobile device
CH1
OUTPUT
CH1
Trim/EQ/
SOUND COLOR FX
Trim/EQ/
SOUND COLOR FX
CH2
(RETURN AUX) CH2
Ch Fader/
BEAT FX
BUS
MASTER VOL
Ch Fader
— [INSERT]: The audio of the channel selected in the effects chan-
nel is input to the external effector (or mobile device), and the
output from the external effector (or mobile device) is input into
the channel selected in effect channel.
Use as SEND/RETURN of the same system as the previous DJM
series.
CH1
OUTPUT
BUS
Trim/EQ/
SOUND COLOR FX
Ch Fader/
BEAT FX/
MASTER VOL
External effector /
Mobile device
! For details, see Block Diagram on page 23 .
4 Turn the effect channel selector switch.
Select the channel to add the SEND/RETURN function to.
! The channel to add the SEND/RETURN function to is the same as the
channel to which the BEAT FX function is added.
5 Press the [SEND/RETURN] [ON/OFF] button.
! When the [ON/OFF] button is pressed again, the SEND/RETURN
function turns off.
6 Turn the [LEVEL] control for [SEND/RETURN].
Adjusts the SEND/RETURN sound level.
In the following cases, the SEND/RETURN ON/OFF button turns off. When this
function is forced to turn off, it is impossible to turn it on or off.
!
When the DJM-900NXS2 is not connected to an effector
! When the [RETURN TYPE] selector switch is set to [AUX], and the effect chan-
nel set to [1], [2], [3], or [4], and the effect channel input selector switch is set
to [RETURN AUX]
! When the [RETURN TYPE] selector switch is set to [AUX], and the effect
channel set to [CROSS FADER A], or [CROSS FADER B], and one or more of
the channels assigned using the [CROSS FADER ASSIGN] switch is set to
[RETURN AUX]
!
When the [RETURN TYPE] selector switch is set to [AUX], and the effect chan-
nel is set to [MASTER]
Operating software by MIDI interface
This unit outputs the operation information of buttons and controls in
universal MIDI format.
When connected by USB cable to a computer or mobile device on which
a MIDI-compatible software is installed, the software can be operated
from this unit.
Install the software on your computer or mobile device before use. Also,
set the software’s audio and MIDI related settings.
! For MIDI channel setting instructions, see Changing the settings on
page 18 .
! For details of the MIDI messages on this unit, see the website below.
http://pioneerdj.com/support/
1 Connect this unit to computer or mobile device.
— Computer: Connect the [USB] terminal to your computer.
— Mobile device: Connect the mobile device connection terminal to
the mobile device.
For details about connections, see Connecting to the control panel on
page 10 .
2 Launch the software
! When connected to a computer, carry out the following procedure.
When a mobile device is connected, the following procedure is not
necessary.
3 Press the [ON/OFF] button.
Turn the MIDI function on.
Transmission of the MIDI messages begin.
!
When a fader or control is moved, a message corresponding to the
position is sent.
! When the [ON/OFF] button is pressed again, sending of the MIDI
messages is stopped.
! The MIDI timing clock (BPM information) is sent regardless of the
[ON/OFF] button.
! For mobile devices, MIDI messages and MIDI timing clock is sent
constantly.


