


28
Operating Manual V 1.1 – 01/2010
5. Operation
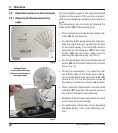
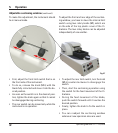
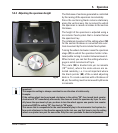
5.2.1 Adjusting the blade presentation
angle
• Theaccessoriesincludeabladeangleindi-
cator (46) for this purpose.
• Toreadthebladeangleusingthisindicator,
hold the angle indicator against the left side
of the blade holder. The notch (47) must be
touching the mounting bar (49) of the blade
holder (50) and the lower edge must be
touching the specimen tray. (Fig. 40/41).
• Fortheadjustment,firstunscrewtheknurled
screw (48) on the blade holder with a screw
driver. (Fig. 41).
• Duringtheadjustment,itisimportantthat
the bottom edge of the blade angle indica-
tor is touching the main specimen bath. (23)
(arrow in Fig. 41). For this purpose, it may be
necessary to move the cutting head forward.
• Now,rotatethebladeholderuntilthesmall
indicator (51) specifies the desired value on
the scale of the blade angle indicator.
• Retightentheknurledscrewsothatitcannot
come loose during sectioning.
• Foradditionalinformationaboutadjusting
the blade holder, refer to the following sec-
tion.
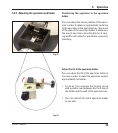
The presentation angle of the sectioning blade
relative to the plane of the section is adjust-
able to suit operating conditions and specimen
types.
The adjustment can be made by rotating the
blade holder (50) on the mounting bar.
Fig. 41
Fig. 40
47
49
23
48
50
46
51
Enlarged detail:
Scale of the blade angle
indicator and indicator on
the blade holder.
5.2 Adjustment options on the instrument