


26 MHD56037 - Edition 5
MAINTENANCE
WARNING
• Never perform maintenance on winch while it is supporting a
load.
• Before performing maintenance, tag controls:
WARNING - DO NOT OPERATE -
EQUIPMENT BEING REPAIRED.
• Only allow service personnel trained in safety and service on
this winch to perform maintenance.
• After performing any maintenance on winch, test winch to
125% of its rated capacity before returning to service. Testing
to more than 125% of rated capacity may be required to
comply with standards outside the USA.
• Shut off air system and depressurize air lines before
performing any maintenance.
Maintenance Intervals
The Maintenance Interval chart is based on intermittent operation
of winch eight hours each day, five days per week. If winch
operation exceeds eight hours per day, or use is under HEAVY or
SEVERE conditions, more frequent maintenance should be
performed. Refer to ‘Periodic Inspection’
on page 22 in
“INSPECTION” section for interval guidance.
Adjustments
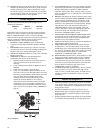
Disc Brake Adjustment (optional feature)
Refer to Dwg. MHP0152 on page 46.
Disc brake adjustment is not required. If disc brake does not hold
rated load disassemble and repair.
If brake assembly is removed or disassembled ensure breather (23)
is installed and located at top of brake housing during reassembly.
Manual Drum Brake Adjustment
Refer to Dwg. MHP0153 on page 48.
1. Release wire rope tension on drum.
2. Raise handle (104) to free brake bands (128).
3. Remove cotter pin (102) and pin (101).
4. Rotate link stud (103) clockwise to increase brake torque.
5. Install pin (101) and check adjustment.
6. Brake should be adjusted until brake lever over center
position can be attained with 50 to 100 lb. (23 to 45 kg)
force on handle (104).
7. Install cotter pin (102) when adjustment is completed. Bend
ends of cotter pin over.
CAUTION
• When any part of brake lining measures 0.062 inch (2 mm)
or less, brake bands (128) or linings must be replaced.
Automatic Drum Brake Adjustment (optional feature)
Refer to Dwg. MHP0153 on page 48.
1. Remove cotter pin (102) and washer (129) at adjustment
clevis (107).
2. Apply air to brake cylinder (110) and remove pin (106) and
second washer (129) to disconnect clevis from brake lever
(105).
3. Turn adjustment clevis (107) clockwise to increase cylinder
rod extension. Turn clevis counterclockwise to decrease
cylinder rod extension.
4. Assemble clevis (107) to brake lever (105) with washer
(129) and pin (106). Release air to brake cylinder (110).
5. Measure cylinder rod extension. Length should be 1 to 1-1/2
inches (25 to 37 mm). Readjust if necessary.
6. Install cotter pin (102) and second washer (129) to secure
clevis to brake lever when adjustment is complete.
7. With brake “On”, adjust screw (127) to just touch arm (124).
Pilot Air Control Valve Adjustment (optional feature)
Refer to Dwg. MHP0141 on page 60.
If winch operating speeds differ from performance specifications
pilot air control valve may require adjustment. Loosen nut (271)
and adjust adjusting screw (270), located in valve end cap (268),
until drum speed for no-load haul-in equals drum speed for full
load payout. Rotate screw (270) ‘out’ to increase drum speed and
‘in’ to decrease drum speed. It is suggested that a chalk mark be
placed on drum flange so that drum rpm can be accurately
counted.
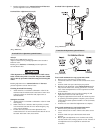
Overload Valve Adjustment (optional feature)
new style
Refer to Dwg. MP2216 on page 27
5/16 in. or 8 mm open ended wrench required.
1. Adjust overload valve by turning adjustment screw located at
bottom of control valve.
2. Rotating adjustment screw clockwise will increase pressure
required to activate overload valve.
WARNING
• This adjustment can cause overload device to NOT activate
before winch’s safety limit is exceeded. This procedure should
only be done by personnel trained in testing and servicing this
winch.
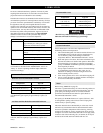
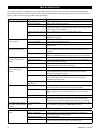
INTERVAL MAINTENANCE CHECK
Start of each shift
(Operator or
Maintenance
Personnel)
Make a thorough visual inspection of winch
for damage. Do not operate winch if
damaged.
Operate winch at low RPM in both
directions. Winch must operate smoothly
without sticking, binding or abnormal
noises. Check operation of brake(s)
3 Months
(Maintenance
Personnel)
Inspect drum brake friction linings. Clean or
replace parts as required. Adjust drum brake
as necessary.
Year ly
(Maintenance
Personnel)
Inspect winch gearing, shafts and bearings
for wear and damage. Repair or replace as
necessary.
Check all supporting members, including
foundation, fasteners, nuts, sheaves and
rigging, etc. for indications of damage or
wear. Repair or replace as required.