


21
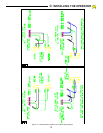
Triac Light stays ON. Lock light is ON.
6. Terminal #6, Stop,: Both Open and Close Triac lights are
momentarily ON, then both Open and Close Triac lights go
OUT. The Lock light goes OUT. The stop light is ON as
long as the wire is held on the terminal and the stop light goes
OUT when the wire is removed.
7. Terminal #7, Close.: Observe that the Close Triac Light
comes ON, the Lock light is ON and the Close light is ON.
Remove the wire from terminal #7 and observe that the Close
light goes OUT the Triac and Lock lights stay ON.
8. Terminal #9, Reversing Loop,: Observe that both Triac lights
are ON momentarily and then the Close Triac light goes OUT
and the Open Triac light stays ON. The lock light is ON.
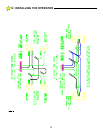
9. Terminal #6, Stop,: Same as before above, Sequence 6.
10. Terminal #12, Alternate: Alternate light is ON, Close Triac
light is ON and Lock light is ON. Remove wire and note that
the Alternate light goes OUT but the Close and Lock lights
stay ON.
11. Hit Terminal #12, Alternate again: Note that the Alternate
light comes ON, that the Close Triac light goes OUT and that
the Open Triac light comes ON and that the Lock light stays
ON.
12. With the multimeter set to measure DC voltage on the 50 Volt
scale or more, measure approximately 28 Volts DC at
Terminal #1, LOCK.
CHECK OF THE INDICATOR LAMPS HAS BEEN
COMPLETED.
IF THE INDICATOR TEST PERFORMED
SATISFACTORILY, TURN OFF THE AC POWER SWITCH
AT THE HDSWG 1000 CONTROL BOX AND REPLACE THE
15 AMP FUSE.
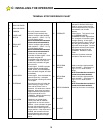
PRE POWER-ON CHECKLIST
Before running the HDSWG 1000, make sure
1. The proper Left-or Right-hand or Bi-Parting wiring has been
completed.
2. The Limit Switch Cams have been preliminarily set.
3. The Motor Overload Sensitivity has been preset.
4. The Switch Selectable Options have been set.
5. The Gate has been positioned in the center of it's travel.
6. The Torque Limiter is properly adjusted.
7. No other devices should be connected to the terminal strip
until the powering-up procedures are completed.
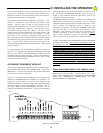
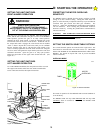
RUNNING THE HDSWG 1000
Turn ON the main power switch. The stop cycle "thump" should be
heard and both the OPEN and CLOSE Triac Lamps should come on
for approximately 1/2 second and then go out. The gate should not
move. If the gate moves in either direction more than a few inches or
continues to run, turn off the power and call Factory Service for
assistance.
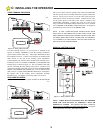
1. Give the HDSWG 1000 a command to open by touching the
jumper wire connected to Terminal #13 (COMMON) to Terminal
#8 (RADIO OPEN). The gate should move to the fully open
position.
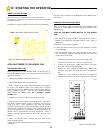
2. If the TIMER TO CLOSE option has been selected, the timer will
activate the gate to close within approximately 45 seconds.
3. Allow the gate to close and note the position of the gate.
IF THE GATE HITS THE OPEN OR CLOSE STOPS OR
EITHER THE OPEN OR CLOSE TRIAC LIGHT REMAINS
ON AFTER REACHING THE MECHANICAL STOPS AND
THE LIMIT SWITCH LIGHT IS "ON", TURN OFF THE
MAIN POWER SWITCH. IF THE GATE HITS THE
MECHANCAL LIMIT AND THE LIMIT SWITCH LIGHT
DOES NOT COME ON, THE LIMIT CAM OR THE STOP
WILL NEED TO BE READJUSTED
If the gate stops short of the desired fully open or closed position
or if it bangs against the end stops, TURN OFF THE MAIN
POWER and reset the appropriate Limit Switch Cam. After you
have attained the final adjustment, run the HDSWG 1000 open and
closed several times to ensure that the positions set will be retained.
WARNING!
RISK OF ENTRAPMENT
OVERLOAD SENSITIVITY HAS NOT BEEN SET.
DO NOT ALLOW ANYONE NEAR THE GATE AND
DO NOT LEAVE GATE AND HDSWG 1000
UNATTENDED UNTIL FOLLOWING PROCEDURES
HAVE BEEN COMPLETED.
USE CAUTION DURING THIS FINAL
ADJUSTMENT PERIOD.
D:
STARTING THE OPERATOR