


6
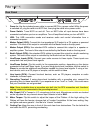
Mixer Controls
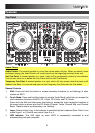
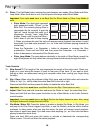
5. Input Selector: Set this switch to the desired audio source from this channel: PC (a track
playing on that layer in the software), Mic 2 or Line (a device connected to the Mic 2 Input or
Line Input on NS7II's rear panel). Please note that the Line/Phono selector switches on
NS7II's rear panel must also be set properly. Also, a channel's controls will only send MIDI
information when its Input Selector is set to PC.
Important: Do not set more than one channel's Input Selectors to Mic2; doing so can cause
unwanted feedback or distortion.
6. Gain Trim: Adjusts the pre-fader, pre-EQ audio level of the corresponding channel in the
software.
7. LED Meters: Monitors the audio levels of the corresponding channel.
8. Channel Treble: Adjusts the high (treble) frequencies. When Touch Mode is activated,
touching this knob will mute the corresponding channel's high frequencies (an "EQ kill").
9. Channel Mid: Adjusts the mid-range frequencies. When Touch Mode is activated, touching
this knob will mute the corresponding channel's mid-range frequencies (an "EQ kill").
10. Channel Bass: Adjusts the low (bass) frequencies. When Touch Mode is activated, touching
this knob will mute the corresponding channel's low frequencies (an "EQ kill").
11. Channel Fader: Adjusts the audio level on the corresponding channel in the software.
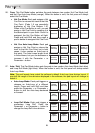
12. PFL: Press this button to send this channel's pre-fader signal to the Cue Channel for
monitoring. When engaged, the button will be lit. By pressing one PFL button at a time, you
will cue that channel alone (and deactivate PFL monitoring for the other channels). To cue to
multiple channels simultaneously, press the PFL buttons for those channels at the same
time.
13. Crossfader: Blends audio between the channels assigned to the left and right side of the
crossfader.
14. Master Volume: Adjusts the output volume of the Program Mix.
15. Booth/Zone Volume: Adjusts the output volume of the Booth Output mix.
Playback Controls
16. Platter: Controls the Audio Pointer in the software.
17. Start Time: Controls the rate at which the platter regains its normal playback speed.
18. Stop Time: Controls the rate at which the platter slows to a complete stop ("brake time").
19. Play / Pause: This button pauses or resumes playback.
Press and hold Shift and then press this button to "stutter-play" the track from the last set
Cue Point.
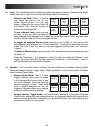
20. Cue: When the Deck is paused, you can set a Temporary Cue Point by moving the Platter to
place the Audio Pointer at the desired location and then pressing the Cue Button.
During playback, you can press the Cue Button to return the track to this Temporary Cue
Point. (If you did not set a Temporary Cue Point, then it will return to the beginning of the
track.)