


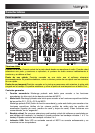

11
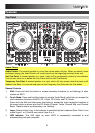
Pitch Controls
35. Tap: Tap this button at the same tempo as the track to help the software detect a more
accurate BPM reading.
36. Range / Master Tempo: Press this to adjust the range of the Pitch Fader to ±8%, ±16%, and
±50%.
Press and hold Shift and then press this button to "lock" the track's pitch to its original key.
The track's tempo will remain at the speed designated by the Pitch Fader.
37. Takeover LEDs: When you select the other Deck with the Deck Select switch, the position of
the NS7II's Pitch Fader may not match the Pitch setting for that Deck in the software. Slowly
move the Pitch Fader in the direction indicated by the Takeover LED arrow until it turns off. At
this point, the Pitch Fader matches the Pitch setting in the software and can control it again.
38. Pitch Fader: Controls the track's playback speed. An LED next to the fader will light up when
set at 0%.
39. Pitch Bend ( + / – ): Press or hold down either of these buttons to temporarily adjust the
track's playback speed. When released, the track playback will return to the speed
designated by the Pitch Fader.
40. BPM Meter: This meter is an aid for matching the tempo of both decks. When the white
center LED is lit, the BPMs are matched. Otherwise, the meter will tend towards the faster
deck. The further from center, the greater the difference between the two BPMs.
The meter is also an aid while adjusting Loop In or Loop Out points. If you are making fine
adjustments to your Loop In or Loop Out points using the Platters, the lit LED will "wrap
around" the meter. It will rest on the white center LED whenever the loop's length has been
doubled or halved exactly.
Note: The BPM Meter will aid in loop adjustments only if (1) a BPM reading has been entered
for that track and (2) the two Decks' tempos have been synchronized.
Navigation Controls
41. Scroll Knob: Use this knob to scroll through lists of tracks, Crates, etc. in the software. You
can also press it to move between the panels shown in the software.
42. Fwd / Back: These buttons move the selector between various panels in the software. Press
and hold Shift and then press Fwd to sort the current Library/Crate/Panel View by album.
Press and hold Shift and then press Back to sort the current Library/Crate/Panel View by
track number.
43. Crates: Press this to move the selector to the Crates Panel in the software. Press and hold
Shift and then press this button to sort the current Library/Crate/Panel View by song.
44. Prepare: Press this to move the selector to the Prepare Panel in the software. Press and
hold Shift and then press this button to sort the current Library/Crate/Panel View by artist.
45. Files: Press this to move the selector to the Files Panel in the software. Press and hold Shift
and then press this button to sort the current Library/Crate/Panel View by BPM.
46. Load A / Load B: Press one of these buttons while a track is selected to assign it to Deck A
or Deck B, respectively.
47. Load Prepare: Press this to add a selected track to the list of tracks in the Prepare Panel in
the software.
48. Panel / View: Press this to toggle through the Recording (Rec), Effects (FX), and Sampler
(SP-6) panels. Press and hold Shift and then press this button to toggle through the available
software display modes (e.g., Vertical, Horizontal, Extended, Library).