


14
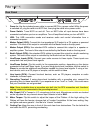
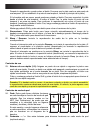
Rear Panel
1
2
3
44
56
7
8
9
7
9
10
11
12
13
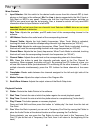
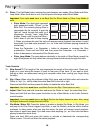
1. Power In: Use the included power cable to connect NS7II to a power outlet. While the power
is switched off, plug the cable into NS7II first, then plug the cable into a power outlet.
2. Power Switch: Turns NS7II on and off. Turn on NS7II after all input devices have been
connected and before you turn on amplifiers. Turn off amplifiers before you turn off NS7II.
3. USB: This USB connection sends and receives audio and control information from a
connected computer.
4. Master Output (XLR): Connect this low-impedance XLR output to a PA system or powered
monitors. The level of this output is controlled with the Master knob on the top panel.
5. Master Output (RCA): Use standard RCA cables to connect this output to a speaker or
amplifier system. The level of this output is controlled by the Master knob on the top panel.
6. Booth Output (RCA): Use standard RCA cables to connect this output to a booth monitoring
system. The level of this output is controlled by the Booth knob on the top panel.
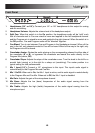
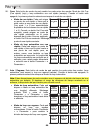
7. Line/Phono Inputs (RCA): Connect your audio sources to these inputs. These inputs can
accept both line and phono-level signals.
8. Line/Phono Switch: Flip this switch to the appropriate position, depending on the device
connected to the Line/Phono Inputs. If you are using phono-level turntables, set this switch to
Phono to provide the additional amplification needed for phono-level signals. If using a line-
level device, such as a CD player or sampler, set this switch to Line.
9. Line Inputs (RCA): Connect line-level devices, such as CD players, samplers or audio
interfaces, to these inputs.
10. Grounding Terminal: If using phono-level turntables with a grounding wire, connect the
grounding wire to these terminals. If you experience a low "hum" or "buzz", this could mean
that your turntables are not grounded.
Note: Some turntables have a grounding wire built into the RCA connection and, therefore,
nothing needs to be connected to the grounding terminal.
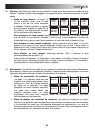
11. Mic 2 Input (1/4"): Connect a 1/4" microphone to this input. Microphone controls are located
on the top panel on any channel whose Input Selector is set to Mic2.
12. Motor Torque: Flip this switch to adjust the torque of the Platters. At the high setting, the
Platters will have the heavier, stronger feel of "modern" turntables. At the lower setting, they
are lighter and more graceful – the feel of a "classic" turntable.
13. Cooling Fan: Keep the area in front of this vent clear from obstructions. The fan behind the
vent cools the NS7II, preventing overheating.