


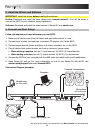

10
30. Slicer: This Pad Mode button switches the pads between two modes: Slicer Mode and Slicer
Loop Mode. When the button is unlit, the first press will always select Slicer Mode.
Important: Your track must have a set Beat Grid for Slicer Mode or Slicer Loop Mode to
work.
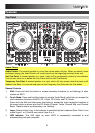
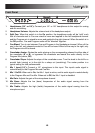
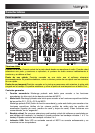
• Slicer Mode: The eight pads represent
eight sequential beats—"Slices"—in the
Beat Grid. The currently playing Slice is
represented by the currently lit pad; the
light will "move through the pads" as it
progresses through each eight-Slice
phrase. Press a pad to play that Slice—
hold it down if you want to keep looping
it. When you release the pad, the track will resume normal playback from where it would
have been if you had never pressed it (i.e., as if the track had been playing forward the
whole time).
Press the Parameter < or Parameter > button to decrease or increase the Slice
quantization. Press and hold Shift and then press the Parameter < or Parameter >
button to decrease or increase the Slice Domain size.
• Slicer Loop Mode: The pads behave identically to the pads in Slicer Mode, except the
eight-Slice phrase will loop rather than moving forward continuously through the track.
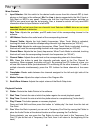
Track Controls
31. Strip Search™: The length of this strip represents the length of the entire track. Place your
finger on a point along this sensor to jump to that point in the track. (If you want to scroll
through a track, we recommend using your computer rather than running your finger along
the strip.)
32. Slip / Clear: When using the software's Beat Grid, press and hold this button and move the
Platter to "slip" (i.e., shift or slide) the entire Beat Grid to the left or right.
Press and hold Shift and then press this button to delete the entire Beat Grid.
Important: Your track must have a set Beat Grid for the Slip / Clear button to work.
33. Adjust / Set: Press and hold this button and move the Platter to "warp" the entire Beat Grid.
Press and hold Shift and then press this button to set a Beat Marker at the Audio Pointer's
current location.
Important: Your track must have a set Beat Grid for the Adjust feature to work. Also, using
the Adjust feature will change the track's BPM.
34. Slip Mode / Motor Off: Press this button to enable or disable Slip Mode. In Slip Mode, you
can jump to Hot Cue Points, trigger Loop Rolls, or use the Platters, while the track's timeline
continues. In other words, when you stop the action, the track will resume normal playback
from where it would have been if you had never done anything (i.e., as if the track had been
playing forward the whole time).
Press and hold Shift and press this button to activate or deactivate the corresponding
Platter's motor. This will not affect the track's playback.
Slice 1
Slice 2 Slice 3
Slice 4
Slice 5
Slice 6 Slice 7
Slice 8