


40
3. Removal and Replacement of Extruding Head
1) Unplug the unit from the electrical outlet.
2) Remove the panels.
3) Remove the thumbscrews and take off the spout from the evaporator.
4) Loosen the cutter with a wrench and remove it.
5) Remove the allen head cap screws and lift off the extruding head.
6) Place new extruding head in place and tighten down allen head cap screws. If the seals
on the allen head cap screws are RED, they must be replaced. If the seals are BLUE,
they may be re-used.
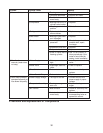
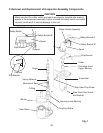
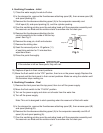
7) Replace the cutter and spout. Make sure that the drip bracket is in the channel and that
safety bracket B is behind safety bracket A. See Fig. 1.
8) Replace the panels in their correct positions.
9) Plug the unit back in.
4. Removal and Replacement of Auger
1) Drain water from the evaporator by using the ush switch.
2) Unplug the unit from the electrical outlet.
3) Remove the panels.
4) Remove the thumbscrews and take off the spout from the evaporator.
5) Loosen the cutter with a wrench.
6) Remove the allen head cap screws securing the extruding head. Using the cutter, lift out
the auger assembly.
7) Remove the cutter and extruding head from the auger and place on the new auger.
8) Install the new auger.
9) Replace the removed parts in the reverse order of which they were removed. When
replacing the spout, make sure that the drip bracket is in the channel and that safety
bracket B is behind safety bracket A. See Fig. 1.
10) Replace the panels in their correct positions.
11) Plug the unit back in.
5. Removal and Replacement of Evaporator
IMPORTANT
Always install a new drier every time the sealed refrigeration system is opened.
Do not replace the drier until after all other repair or replacement has been
made.
1) Remove the panels.
2) Drain water from the evaporator by using the ush switch.
3) Unplug the unit from the electrical outlet.