


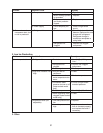
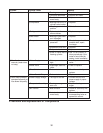


39
1. Upper Bearing Wear Check
To ensure that the bearing inside the extruding head does not exceed the wear tolerance
of .02", follow the instructions below.
1) Unplug the unit from the electrical outlet.
2) Remove the panels.
3) Remove the thumbscrews and take off the
spout from the evaporator.
4) Loosen the cutter with a wrench and
remove it.
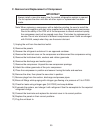
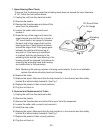
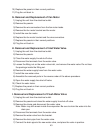
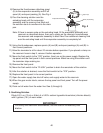
5) Grasp the top of the auger and move the
auger towards you and then try to insert a
.02" round stock or pin gauge in between
the back side of the auger shaft and the
bearing surface. Check several locations
around the auger shaft. If the gauge goes
between the shaft and the bearing at
any point or if the bearing is scratched
or cracked, both the top bearing in the
extruding head and the lower bearing in the
housing should be replaced. Instructions for
removing the extruding head and housing
are located later in this procedure.
Note: Replacing the bearing requires a bearing press adaptor. If one is not available,
replace the whole extruding head and housing.
6) Replace the cutter.
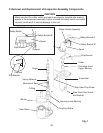
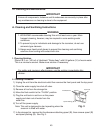
7) Replace the spout. Make sure that the drip bracket is in the channel and that safety
bracket B is behind safety bracket A. See Fig. 1.
8) Replace the panels in their correct positions.
9) Plug the unit back in.
2. Removal and Replacement of Cutter
1) Unplug the unit from the electrical outlet.
2) Remove the panels.
3) Remove the thumbscrews and take off the spout from the evaporator.
4) Loosen the cutter with a wrench and remove it.
5) Install the new cutter.
6) Replace the spout. Make sure that the drip bracket is in the channel and that safety
bracket B is behind safety bracket A. See Fig.1.
7) Replace the panels in their correct positions.
8) Plug the unit back in.
.02" Round Stock
or Pin Gauge
Extruding
Head
Auger
Fig. 2