


6050-065-L-11-08
25
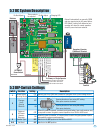
3.5 Entrapment Sensing Adjustment (Adjustable Clutch)
3.4 Automatic Limit Adjustment
The FIRST time the operator is cycled, it will automatically set the open and close limits. The arms MUST be in the
correct closed configuration (See 1.7 on page 14). DO NOT cycle the operator until the arms are in the correct configuration.
The gate open and close positions are determined by the physical stop “flange” on the elbow assembly (See 1.6 on page 13).
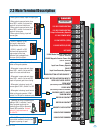
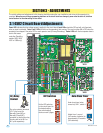
Activate an open device (or momentarily jump across terminals 11 and 20). The gate operator should begin to cycle to the
OPEN position. If the gate operator begins to cycle the gate to the CLOSED position, turn AC power switch OFF, change the
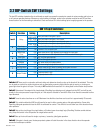
setting of the DIP-switch(s). Primary or single operator, change SW 2, switch 1. Secondary operator, change SW 2, switch 2.
After the gate cycles to the full OPEN position, the clutch will slip for approximately 2 seconds and shut off. Activate a keying
device to close the gate (or allow the timer to close the gate if it is turned on). When the gate cycles to the full closed position,
the clutch will slip for approximately 2 seconds and shut off. The operator limits are now set.
Note: During this initial cycling, be sure that the operator clutch does not slip while the gate is in mid-cycle. If the clutch
slips during mid-cycle, the limit setting will not be correct. Tighten the jamb nut and retry, see below.
Cycle the operator again. Operator will reach the open and close positions and shut off without the clutch slipping.
This vehicular gate operator is equipped with an inherent adjustable clutch (Type C) that is used as the primary entrapment
sensing system. The clutch will slip upon sensing an obstruction during the open or close cycle and gate will reverse direction.
For this system to function correctly, the gate must be properly installed and work freely in both directions. A good set of roller
bearing hinges is essential for proper swing gate operation.
In addition to the mechanical slip clutch, this operator uses an inherent entrapment sensing system (Type A) to further reduce
the possibility of injury should an entrapment occur. The secondary system (Revering sensor) is completely automatic and will
be activated if the clutch fails to slip when an obstruction is sensed during the open or close cycle. This feature requires no
adjustment by the installer or end user.
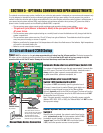
3.6 Secondary Entrapment Protection System
Test the Clutch: Obstruct the gate while it is in the OPENING cycle.
The clutch should slip with no more than 40 Lbs of force for approximately 2 seconds,
then the gate should reverse direction. If the clutch does not slip, it is too tight. Repeat
step 4 and re-adjust the clutch. Note: After the gate has reversed, the operator will be in a
“soft shutdown” making it necessary to initiate the cycle again by momentarily jumping
across terminals 11 and 20.
Obstruct the gate while it is in the CLOSING cycle.
The clutch should slip with no more than 40 Lbs of force for approximately
2 seconds, then the gate should reverse direction. If the clutch does not slip,
it is too tight. Repeat step 4 and re-adjust the clutch. Note: After the gate has
reversed, the operator will be in a “soft shutdown” making it necessary to
initiate the cycle again by momentarily jumping across terminals 11 and 20.
Note: The ideal clutch adjustment will allow the operator to move the gate
through its entire travel cycle without slipping, but will slip upon contact with an
obstruction with no more than 40 Lbs of force. This force can be measured with
a gate scale, DoorKing P/N 2600-225.
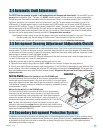
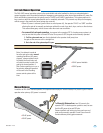
1. Be sure AC power switch is turned OFF whenever adjustments to the clutch are being made. Loosen the upper jamb nut to
“un-lock” the lower jamb nut. Loosen the lower jamb nut.
2. Manually move the gate so that it is positioned approximately half way open.
3. Tighten the lower jamb nut finger tight then tighten it ONE turn with a wrench. Re-tighten the upper jamb nut.
4. Turn AC power switch ON and momentarily jump across terminals 11 and 20. When the gate begins to open, determine if the
clutch is slipping. If the clutch is slipping, turn AC power OFF and tighten the lower jamb nut one more turn. This process may
have to be repeated several times to get the clutch adjusted correctly. Always start the gate from the half open position when
adjusting the clutch.
Jamb Nuts
Clutch