


5
RP360 / RP360 XP
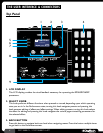
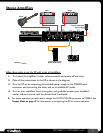
4� EXPRESSION PEDAL (RP360XP ONLY)
The expression pedal provides real-time control of the Volume, Wah, or an assigned effect
parameter� The expression pedal is equipped with a V-Switch that turns the wah on and off when
you apply extra pressure to the toe� See Expression Pedal Control on page 34 for information
on assigning effect parameters to the expression pedal� See Expression Pedal & LFO Assignable
Parameters on page 110 for a list of assignable parameters�
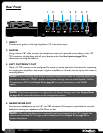
5� DRUMS BUTTON
Press this button to enter the Drum Machine Edit menu, where you can edit the Drum Machine
parameters (PATTERN, TEMPO, and LEVEL)� Once in the Drum Machine Edit menu, pressing the
DRUMS button will toggle the Drum Machine on and off – or you can press the SELECT knob� See
Drum Machine on page 30 for more information on using the Drum Machine�
NOTE: The Drum Machine cannot be used while the Looper is active� If a loop has been
recorded using the Looper, you must clear the loop before the Drum Machine can be used� To
clear a loop, stop loop playback then press and hold
FOOTSWITCH 3� See Looper on page
28 for further information on operating the Looper�
6� SYSTEM BUTTON
Press this button to access the global System Settings menu, where you can edit global parameters
which determine how the RP360/RP360XP processor functions� See System Setup on page 41
for information on the options and parameters available in this menu�
7� STORE BUTTON
Use this button to store, rename, and copy presets� The STORE button LED will light whenever a
preset’s stored parameters are altered, indicating that the changes must be stored to a user preset
to be retained� See Managing Presets on page 15 for more information on presets�
8� EDIT KNOBS
In this manual, these knobs are referred to as the EDIT 1 knob, EDIT 2 knob, and EDIT 3 knob –
from left to right� These knobs are used to edit on-screen system and effect parameters� From the
Performance state, the EDIT 1 knob will adjust the Preset Level (which affects the output level of
the currently loaded preset only) and the EDIT 3 knob will adjust the Master Level (which affects
the output level of all presets)� See Preset Level & Master Level on page 25 for further
information on these output level controls�
9� FOOTSWITCHES
These footswitches are used for multiple functions and can be configured to operate in Preset
Mode, Stomp Mode, or Bank Mode� See Footswitch Modes on page 41 for more information
on footswitch modes�