


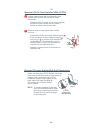

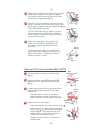


After selecting a seating location,
if adjustable, adjust vehicle seat
back into most upright position.
Rotate car seat on lower base to
forward-facing position, see “Changing
Forward-Facing/Rear-Facing Use
Position” section.
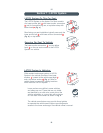
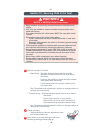
Remove the lower anchor connectors
from their storage locations on back
of car seat pad (fig. a).
- Depress spring on hook-on
connector (fig. b) and remove
from LATCH connector storage
ring.
Lengthen lower anchor belt by pressing
down on belt adjuster slide button on
top of belt adjuster and pulling belt to
extend the length of lower anchor belt
(fig. c).
31
(fig. a)
2
3
4
5
Hook-on Lower
Anchor Connector
(fig. c)
Lower
Anchor Belt
Belt
Adjuster
Pull
Belt Adjuster
Slide Button
(fig. b)
Opening
Hook-on
Connector
LATCH Connector
Storage Ring
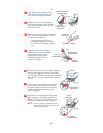
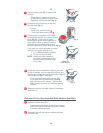
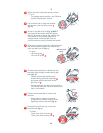
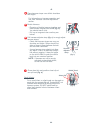
Check that the lower anchor belt is through
the belt path openings marked “Belt Here
Forward-facing” (fig. d). If lower anchor belt is not
through the forward-facing belt path openings, see
“LATCH - Changing Belt Path Location” section.
Place car seat forward-facing in the
vehicle seat location selected with
forward-facing belt path toward vehicle
seat back and centered between the
vehicle lower anchors (fig. d).
Adjust car seat to desired recline position
1, 2 or 3.
-To change recline position, see “Recline Position
Adjustment” section.
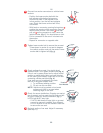
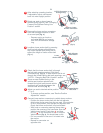
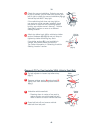
Connect lower anchor connectors to vehicle lower anchors.
- Position the lower anchor belt with the belt adjuster
slide button facing away from the car seat. If the adjuster
is not in that position, turn the belt and adjuster over.
Check that lower anchor belt is flat,not twisted.
- With hook-on connector opening facing down ,
position the opening of the connector over the
vehicle lower anchor. Push down and then
pull out on the connector to lock it onto the
vehicle anchor (fig. e). You should hear a click.
- Pull on connector to be sure it is locked onto
the anchor.
- Repeat for connector on
opposite side.
32
8
7
9
1
2
3
(fig. e)
2
3
1
(fig. d)
Forward-facing
Belt Path
6