


25
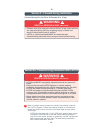
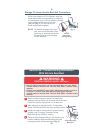
Section 8b - Rear-facing Installation
With Vehicle Seat Belt
WARNING
DEATH or SERIOUS INJURY can occur
• Not all vehicle seat belts can be used with this car seat. Read
vehicle owner’s manual and “Vehicle Seat Belts” section in this
manual.
•Vehicle seat belt MUST stay tightly adjusted around car seat at
all times. If vehicle seat belt does not stay tight, read the
vehicle owner’s manual and “Vehicle Seat Belts” section in this
manual.
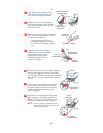
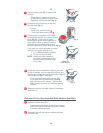
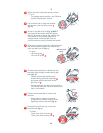
Refer to vehicle owner’s manual to identify the
seating locations which can be used with a car seat.
Check for specific instructions for car seat use.
After selecting a seating location, if adjustable,
adjust vehicle seat back into most upright position.
Rotate car seat on lower base to rear-facing
position, see “Changing Forward-Facing/
Rear-Facing Use Position” section.
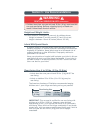
Place car seat rear-facing in the vehicle seat
location with rear-facing belt path openings
toward vehicle seat back (fig. a).
2
3
1
(fig. a)
4
Rear-facing
Belt Path
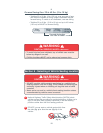
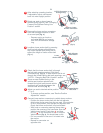
Recline car seat keeping the line inside
level indicator in the green striped zone
(fig. b). To change recline position, see
“Recline Position Adjustment” section.
NOTE: Level indicator is located on the
opposite side of car seat and not
on the side shown.
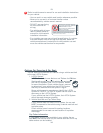
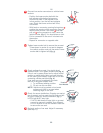
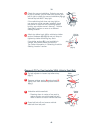
Lift pad off of foot end of car seat
to expose rear-facing belt path
and belt lock-off (fig. c).
Open blue belt lock-off (fig. c) that is on
the same side of car seat as the vehicle
buckle that will be used to secure
the vehicle belt.
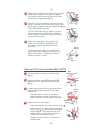
To open:
- Lift locking tab .
- Lift lock-off cover .
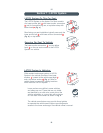
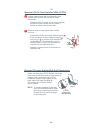
Thread vehicle lap belt or vehicle lap and shoulder
belts through belt path and belt lock-off (fig. d):
- Thread vehicle seat belt through rear-facing
belt path openings and place vehicle
seat belt across belt lock-off .
- Buckle seat belt and remove any slack in
the vehicle seat belt. Be sure vehicle seat
belt is not twisted.
26
(fig. d)
1
5
7
1
(fig. b)
Green
Striped Zone
Level
Indicator
8
(fig. c)
6
2
2
2
1
1
2
Belt Lock-off
Open