Rev 2.00 42 Document 900.0399
03/06
Table 6-1 Live Viewing Interface Controls
Interface Control Description
Displays the current date and time when viewing live
video.
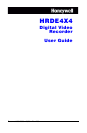
Click to Connect to the DVR.
If you click Connect, this Connect pop up window
appears. Enter the IP Address and the Port number.
Then select the Protocol type and enter the network
Password. Click OK to initiate the connection.
Caution Port No: It should be the same as the DVR’s
port number (the default port number is 5445 on both
DVR and RAS).
Caution Password: It should be the same as the
DVR’s network password (the default password is
1111), set in the System menu on your DVR.
Remote access should be set to ON in the Network
Setup menu on the DVR.
Note Maximum of 16 connection entries.
Click to Disconnect from the DVR.
Note This button only appears when you are
remotely connected to a DVR.
Click to open the Local Search user interface. See
Search and Playback Viewing, page 44, for
information on searching the hard drive of the local
PC for recorded video.
Click to open the Remote Search user interface. See
Search and Playback Viewing, page 44, for
information on searching the hard drive of the
remotely connected DVR for recorded video.
Click to open the Live Video user interface.
Click to Lock all the operations on the DVR.
Note When this button is clicked it changes to the
Unlock button.