••••••••••••••••••••••••••••••••••••••••••••••••••••••••••••••••••••••••••••••••••••••••••••••••••••••••••••••••••••••••••••••
50
SECTION THREE
••••••••••••••••••••••••••••••••••••••••••••••••••••••••••••••••••••••••••••••••••••••••••••••••••••••••••••••••••••••••••••••
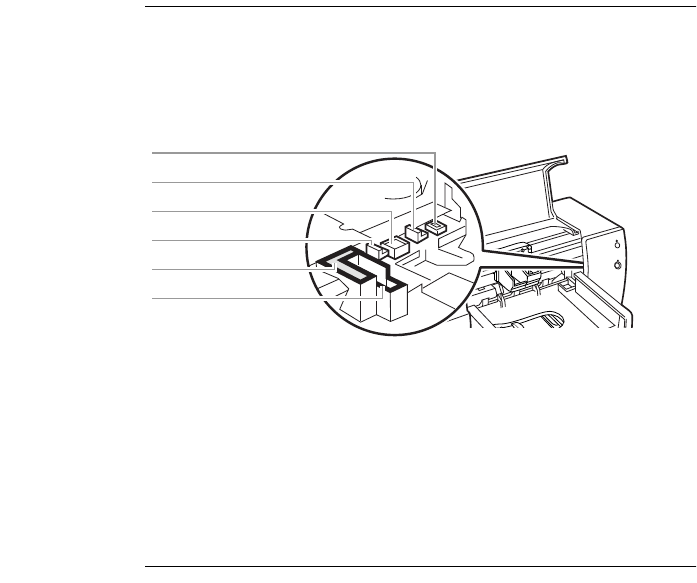
Clean the Service Station
1. Using a clean, moistened swab, clean the rim of the sponge
holder.
2. Remove any built-up ink and fibers from the top of the sponge. If
the sponge is higher than the rim, use the cotton swab to push it
below the rim.
3. Using a clean, moistened swab, clean wiper 1 and the top
surface of cap 1.
CAUTION
Use a light force when cleaning the print cartridge caps. A heavy force may unseat
the caps, eventually causing damage to the print cartridges.
4. Using a clean, moistened swab, clean wiper 2 and the top
surface of cap 2.
Reinstall the Print Cartridges
1. Reinstall the print cartridges and close the printer’s top cover.
2. Reinsert the power cord into the back of the printer.
3. Print a self-test page. On the Printer Services tab of the
HP Toolbox, click the Print a self-test page button.
4. Examine the printout for ink streaking.
N OTE
This procedure should remove all fibers that would cause ink to streak on a print-
out; however, it is possible that fibers may have been missed. If the printout still
shows streaking, repeat the procedure until the self-test printout is clear and sharp.
It is recommended that you perform this cleaning every 3 months. This procedure
and additional maintenance tips are located on the Would Wide Web at
http://www.deskjet-support.com/maintenance.
7539-13
Cap 2
Rim
Wiper 2
Cap 1
Wiper 1
Sponge


