


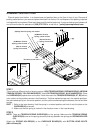
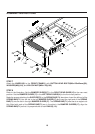
STEP 1
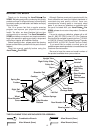
There are three different levels of tension springs, HIGH TENSION SPRING, RED MARKED(66), MEDIUM
TENSION SPRING, YELLOW MARKED(67), and LOW TENSION SPRING, BLUE MARKED(68). Place
the CARRIAGE(42) upside down on the floor. Hook the ends of the TENSION SPRINGS(66, 67, 68) without
color marks into the positions shown in the illustration. The blue marked springs are in the outside positions,
the red marked spring is in the center position, and the yellow marked springs are between the red and blue
springs.
HINT:
ASSEMBLY INSTRUCTIONS
Place all parts from the box in a cleared area and position them on the floor in front of you. Remove all
packing materials from your area and place them back into the box. Do not dispose of the packing materials
until assembly is completed. Read each step carefully before beginning. If you are missing a part please call
our toll-free number for assistance 1 (800) 375-7520 or e-mail us at : parts@staminaproducts.com
7
(68)Low Tension
Spring, blue marked
(67)Medium Tension
Spring, yellow marked
(66)High Tension Spring, red marked
(68)Low Tension
Spring, blue marked
(67)Medium Tension
Spring, yellow marked
Tension
Spring
Refer to the inset drawing. Hold the spring in a vertical position and hook it onto the plate on the
CARRIAGE(42) as shown.
Make sure that the spring is hooked in the direction shown in the inset drawing.
1.
2.
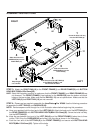
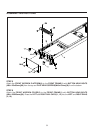
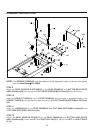
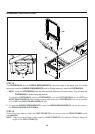
STEP 2
NOTE:
End without color mark
Attach the SPRING HOLDER(62) to the CARRIAGE BOARD(52) with BUTTON HEAD BOLTS
(M6x1x82mm)(84).
There are TENSION SPRING SLEEVES(69) on the springs. Make sure the TENSION SPRING
SLEEVES(69) cover on the springs smoothly and stay between the springs and SPRING HOLDER
(62).