


6050-065-L-11-08
14
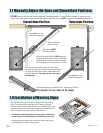
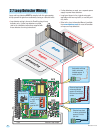
1.7 Manually Adjust the Open and Closed Gate Positions
1.8 Installation of Warning Signs
This DoorKing Swing Gate Operator is shipped with two warning
signs. The purpose of the warning sign is to alert uninformed
persons, and to remind persons familiar with the gate system, that
a possible hazard exists so that appropriate action can be taken to
avoid the hazard or to reduce exposure to the hazard.
• Permanently install the supplied warning signs in locations so
that the signs are visible by persons on both sides of the gate.
• Use appropriate hardware such as wood or sheet metal screws
(not supplied) to install the warning signs.
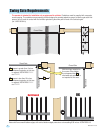
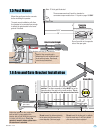
90°90°
Open Gate
Open Gate
Closed Gate
Arms will be aligned on the SAME imaginary
straight line when open or closed. Slide elbow
assembly back and fourth, manually opening
and closing gate until arms function as shown.
DO NOT power up the operator to set the open and closed gate positions. The first time the operator is powered up and
cycled, it will automatically set the open and close limits. To do this, the arms MUST already be in the correct configuration.
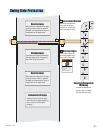
Once you are sure that the gate opens and closes
correctly, trim off excess length from arms and secure
the arms with the 6 allen screws. Install safety cover
on elbow assembly. The arms are now in the correct
configuration.
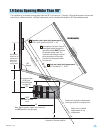
Arms must be on the
imaginary straight line.
Arms must be on the
imaginary straight line.
Approximate pivot
point distances.
Elbow flange MUST
be in this position.
Closed Arms Position Open Arms Position
Cra
nk Power Arm
Crank
Arm
Install the locking pin and padlock in the “Closed Arms Position”.
The operator is now ready for AC power.
37.5”
24”