


Operating Instructions
COLORado™ 3P User Manual 16 3/17/2009 9:54 AM
ID Address: 01
ID Address: 02
ID Address: 03
ID Address: 04
ID Address: 05
ID Address: 06
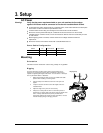
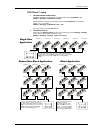
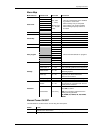
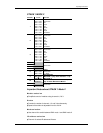
The figure above shows 6 fixtures connected in series with corresponding
addresses. Each fixture has {ID ON} in the fixture’s settings. You must set the
{Range} settings in the controller to [006] before accessing {Effect}
programs.
UP DOWN EXITSET
Single Row
Application
ID Address: 01
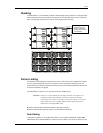
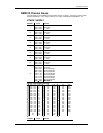
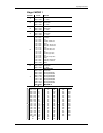
The figure above shows 9 fixtures
connected in series with
corresponding addresses. Each
fixture has {ID ON} in the fixture’s
settings. You must set the {Range}
settings in the controller to [009]
before accessing {Effect} programs.
UP DOWN EXITSET
Block Application
ID Address: 02
ID Address: 03
ID Address: 04
ID Address: 05
ID Address: 06
ID Address: 07
ID Address: 08
ID Address: 09
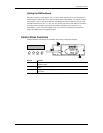
ID Address: 01
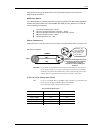
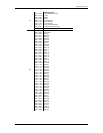
The figure above shows 9 fixtures connected
in series. Three rows comprised of 3 fixtures
are addressed identically. Each fixture has {ID
ON} in the fixture’s settings. You must set the
{Range} settings in the controller to [003]
before accessing {Effect} programs.
ID Address: 02
ID Address: 03
ID Address: 01
ID Address: 02
ID Address: 03
ID Address: 01
ID Address: 02
ID Address: 03
Repeat Row Block Application
UP DOWN EXITSET
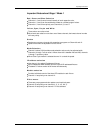
COLORcon™ setup
1. FIXTURE CONTROL PANEL SETUP
Activate ID addressing in each fixture by setting panel function {ID ON/OFF} to ON.
{MENU} {Settings) {ID ON/OFF} [ON]
Set ID addresses in each fixture by setting panel function {ID address} to incremental
values. (I.e. 1,2,3,4,5,6,etc…)
{MENU} {Settings} {ID address} [01 ~ 66]
It is not necessary to set the DMX address.
2. CONTROLLER SETUP
When using the {Effect program} function, it is necessary to set the {Settings} {Range}
setting, which is the quantity of fixtures in series.
{MENU} {Settings} {Range} [ (No. of fixtures) ]